I recently got into Kubernetes Cluster API Provider vSphere (CAPV) to understand what it is, what it does and where it fits in the Kubernetes and VMware ecosystem. The answer is a lot simpler than it seems and it is already used by several companies such as VMware (Tanzu Kubernetes Grid) or Giant Swarm to only name a couple. If you’re wondering, the three “kubernetes turtles” in the picture below is the Cluster-API logo.
So, the way Kubernetes provisions resources is declaratively through YAML manifest describing the state you want them to be in. By default these manifests cover “vanilla” Kubernetes objects such as deployments, pods, replicasets, services, ingress, you name it. You can get the list by running “kubectl api-resources”.
What is Cluster API Provider vSphere (CAPV)
Projects like cluter-api expand the capabilities of Kubernetes by offering the possibility to interface with many cloud providers such as AWS, Azure, Sidero, etc to provision Kubernetes workload clusters. These extra capabilities are in the form of Custom Resource Definitions (CRD) and controllers that know how to “speak” (API) to these cloud providers in order to deploy the nodes as VMs and then create a cluster with kubeadm. The cluster-api resources are installed in what is referred to as a kubernetes management cluster that remains and is used to provision Kubernetes clusters on a cloud provider.
In our case we are interested in the vSphere provider called Cluster API Provider vSphere or CAPV. For instance, you can see pretty much the same steps when getting started with Tanzu Community Edition, except TCE is made a lot simpler through UI and automation. In this post we are doing essentially the same steps but manually, that way we can see what’s going on behind the scenes.
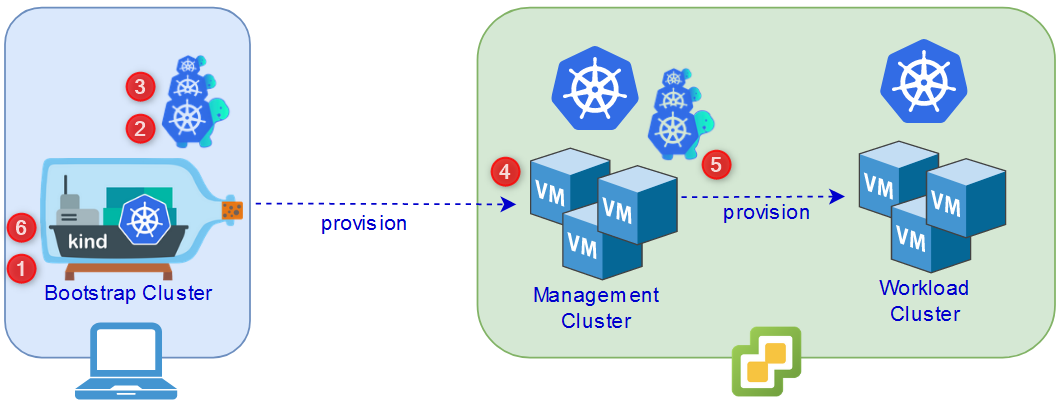
The steps to get started with cluster-api are as follows:
- Install Kind on a bootstrap VM: We will use a debian VM to run a temporary cluster with Kind and delete it at the end.
- Create a bootstrap cluster with Kind: You could turn an existing kubernetes cluster in a management cluster but the more common process is to use a temporary kind cluster to provision a kubernetes cluster on your cloud provider and then move the cluster-api components to it, rendering the temporary cluster obsolete.
- Download clusterctl and initialize the temporary cluster with it: clusterctl is the command line tool for cluster-api. The cluster has to be prepared with a configuration file containing the details about the vSphere environment. That way the cluster knows how to speak with the vSphere infrastructure.
- Provision the kubernetes cluster to the cloud provider: A YAML manifest has to be generated with clusterctl, containing the details of the kubernetes cluster to deploy and then apply it.
- Move the cluster-api components to the kubernetes cluster: We then need to connect to the cluster in SSH, run step 3 against it and then move the components from the bootstrap cluster using clusterctl.
- Decommission the bootstrap cluster: The last step is to delete the bootstrap kind cluster if you no longer have a use for it.
Getting started with Cluster API Provider vSphere (CAPV)
Let’s dig into it and see how we can get a Kubernetes cluster-API management cluster in vSphere in 6 steps. While this is more complicated than Tanzu Community Edition which offer a shiny web UI, it is still made easy thanks to the efforts of the team behind the cluster-API project as well as kubeadm.
Prerequisites
There are a few things I want to touch on before starting with Cluster-API. The bootstrap machine used in this how-to is an Ubuntu Server VM by the way.
- Download and deploy a Kubernetes OVA: This will be the template that Cluster-API will use to deploy kubernetes nodes as VMs in vSphere. I used the OVAs provided by VMware for Tanzu Community Edition where you can choose between ubuntu and photon. I downloaded ubuntu-2004-kube-v1.21.2+vmware.1-tkg.1-7832907791984498322.ova at the time of this writing. Note that you can also build your own should you be up for it. You then need to deploy the OVA to your vSphere environment and turn it into a template.
- Have a bootstrap machine: Ensure you have a machine with Docker and kubectl installed to make it more convenient. You can use a Linux VM for instance, in case you don’t want to mess with your workstation.
- DHCP Service: Your vSphere environment should be configured with a DHCP service in the primary VM Network for your workload Kubernetes clusters.
- SSH public key: You should have an SSH key to put in the config file since this is the only way to connect into the nodes that are deployed.
Step 1 - Install Kind on a bootstrap VM
In our how-to, we are using an Ubuntu VM, however, you can find the procedure for MacOS and Windows in the official Kind documentation.
curl -Lo ./kind https://kind.sigs.k8s.io/dl/v0.11.1/kind-linux-amd64
chmod +x ./kind
mv ./kind /usr/bin/kind
Step 2 - Create a bootstrap cluster with Kind
Creating a bootstrap kind cluster is as easy as it gets. Just run this one liner, it will create the “nested” kubernetes cluster and create the Kubeconfig file so you can connect to it directly.
kind create cluster
The output should look like so:
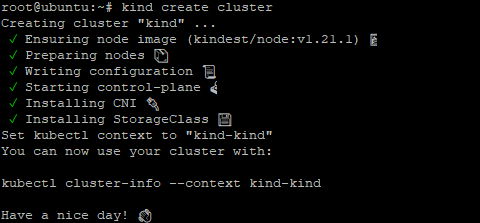
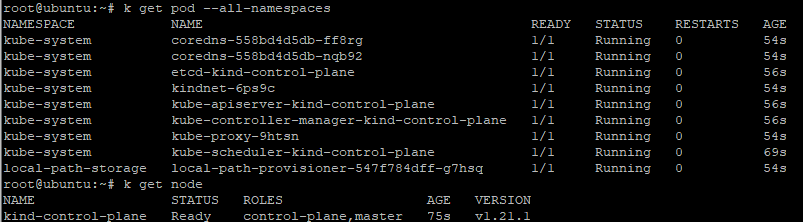
At this point you should already be able to query your kind cluster with kubectl.
Step 3 - Download clusterctl and initialize the temporary cluster with it
Clusterctl is the Cluster-API command line utility that will let you initialize a management cluster. We need to download the utility, move it in our PATH and initialize (prepare) the cluster.
- First let’s download the utility, make it executable and move it to our PATH.
This example uses clusterctl version 1.0.1 but check for the latest clusterctl release here.
curl -L https://github.com/kubernetes-sigs/cluster-api/releases/download/v1.0.1/clusterctl-linux-amd64 -o clusterctl
chmod +x ./clusterctl
sudo mv ./clusterctl /usr/local/bin/clusterctl
- Then create the YAML clusterctl configuration file.
Create the hidden folder first.
mkdir ~/.cluster-api
nano ~/.cluster-api/clusterctl.yaml
- Specify the settings of your vSphere environment following this format:
These are case sensitive so pay attention to it. You will obviously have to adapt this file to your environment. Note that it is better to do it with a file than environment variables since the password won’t be in your bash history and you can sanitize it once done. These fields are specific to vSphere obviously and clusterctl will know about that in the next step when we specify the provider.
Note that I chose 192.168.1.140 as the virtual IP (kube-vip) for my kubernetes cluster. More on that later.
You need to make sure you put your SSH public key in this file or you won’t have SSH access to your control plane.
## -- Controller settings -- ##
VSPHERE_USERNAME: "[email protected]"
VSPHERE_PASSWORD: "Uh uh"

## -- Required workload cluster default settings -- ##
VSPHERE_SERVER: "192.168.1.102"
VSPHERE_DATACENTER: "LAB01-DC"
VSPHERE_DATASTORE: "LAB01-VSAN"
VSPHERE_NETWORK: "management"
VSPHERE_RESOURCE_POOL: "*/Resources"
VSPHERE_FOLDER: "CAPV"
VSPHERE_TEMPLATE: "ubuntu-2004-kube-v1.21.2+vmware.1"
CONTROL_PLANE_ENDPOINT_IP: "192.168.1.140"
VSPHERE_TLS_THUMBPRINT: "D5:...:0E"
EXP_CLUSTER_RESOURCE_SET: "true"
VSPHERE_SSH_AUTHORIZED_KEY: "ssh-rsa AAAAB3N...+G/Xpnc>
VSPHERE_STORAGE_POLICY: ""
- Then we want to initialize our kind kubernetes cluster as a management cluster with clusterctl.
Note that vSphere is the provider here, you would change it to aws, azure, alibabacloud or whatever else should you deploy to some other cloud provider.
clusterctl init --infrastructure vsphere
The output should look something like this. As you can see clusterctl does the heavy lifting for us here.
root@ubuntu:~# clusterctl init --infrastructure vsphere
Fetching providers
Installing cert-manager Version="v1.5.3"
Waiting for cert-manager to be available...
Installing Provider="cluster-api" Version="v1.0.1" TargetNamespace="capi-system"
Installing Provider="bootstrap-kubeadm" Version="v1.0.1" TargetNamespace="capi-kubeadm-bootstrap-system"
Installing Provider="control-plane-kubeadm" Version="v1.0.1" TargetNamespace="capi-kubeadm-control-plane-system"
I1119 14:53:44.492746    6548 request.go:665] Waited for 1.043003371s due to client-side throttling, not priority and fairness, request: GET:https://127.0.0.1:46309/apis/clusterctl.cluster.x-k8s.io/v1alpha3?timeout=30s
Installing Provider="infrastructure-vsphere" Version="v1.0.1" TargetNamespace="capv-system"

Your management cluster has been initialized successfully!

You can now create your first workload cluster by running the following:

  clusterctl generate cluster [name] --kubernetes-version [version] | kubectl apply -f -
Step 4 - Provision the kubernetes cluster to the cloud provider
At this point we have a bootstrap management cluster. What we want to do next is to provision a workload cluster in our vSphere environment (which will later be our management cluster after we move the components).
- First we need to generate a YAML manifest to describe the workload cluster to deploy. Note that this step does not deploy anything, we are only using clusterctl to create a YAML file.
Adjust the fields as necessary. In this example I am deploying a cluster named capv-management with 1 control plane node and 1 worker node, in Kubernetes version 1.21.1 since it is the version of the OVA I deployed and I redirect the output to cluster.yaml.
clusterctl generate cluster capv-management \
    --infrastructure vsphere \
    --kubernetes-version v1.21.1 \
    --control-plane-machine-count 1 \
    --worker-machine-count 1 > cluster.yaml
- Optional: Edit the manifest.
Now you can always open cluster.yaml and make changes to the configuration as you see fit.
nano cluster.yaml
- When you are happy with your manifest, apply it using kubectl and it will start the provisioning process.
This step takes a bit of time so be patient here. However, if nothing is happening in vCenter and you don’t see a VM being cloned, it means there probably is a misconfiguration somewhere in your clusterctl.yaml file, in which case you will want to double check it’s content (case, typos…).
kubectl apply -f cluster.yaml
The output should look something like this:
root@ubuntu:~# kubectl apply -f cluster.yaml
cluster.cluster.x-k8s.io/capv-management created
vspherecluster.infrastructure.cluster.x-k8s.io/capv-management created
vspheremachinetemplate.infrastructure.cluster.x-k8s.io/capv-management created
kubeadmcontrolplane.controlplane.cluster.x-k8s.io/capv-management created
kubeadmconfigtemplate.bootstrap.cluster.x-k8s.io/capv-management-md-0 created
machinedeployment.cluster.x-k8s.io/capv-management-md-0 created
clusterresourceset.addons.cluster.x-k8s.io/capv-management-crs-0 created
secret/capv-management created
secret/vsphere-csi-controller created
configmap/vsphere-csi-controller-role created
configmap/vsphere-csi-controller-binding created
secret/csi-vsphere-config created
configmap/csi.vsphere.vmware.com created
configmap/vsphere-csi-node created
configmap/vsphere-csi-controller created
secret/cloud-controller-manager created
secret/cloud-provider-vsphere-credentials created
configmap/cpi-manifests created
- You can use kubectl get cluster to view your workload cluster.
Note that cluster is a Custom Resource Definition (CRD) created by clusterctl during initialization. This command would not work in a regular Kubernetes environment.
kubectl get cluster
The output should look like so. Wait a bit and it should say provisioned at some point.

- You can also track the provisioning process with clusterctl to see where it’s at. You will notice that this is what the tanzu cli is based on, only slightly rebranded by VMware.
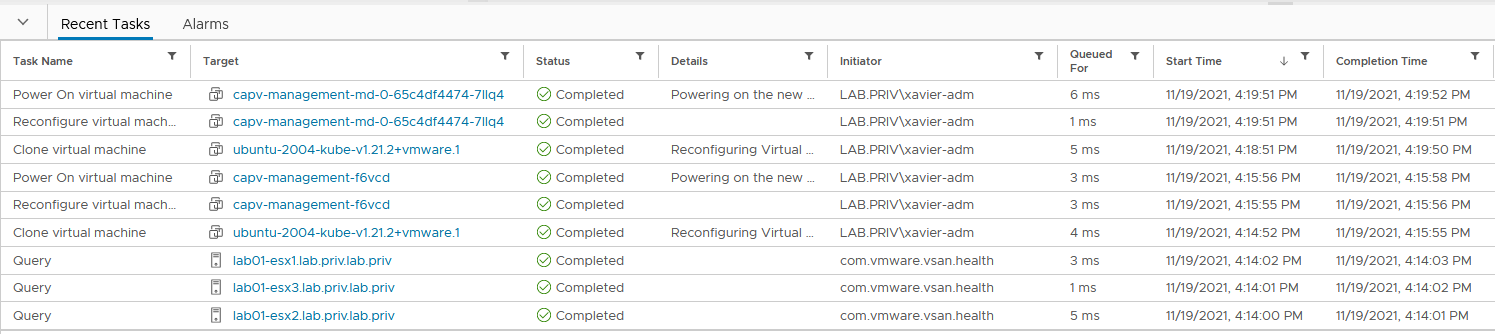
You will see the progress as you refresh this command and that it fits with what is going on in vSphere.
clusterctl describe cluster capv-management

The tasks as they appear in vCenter.
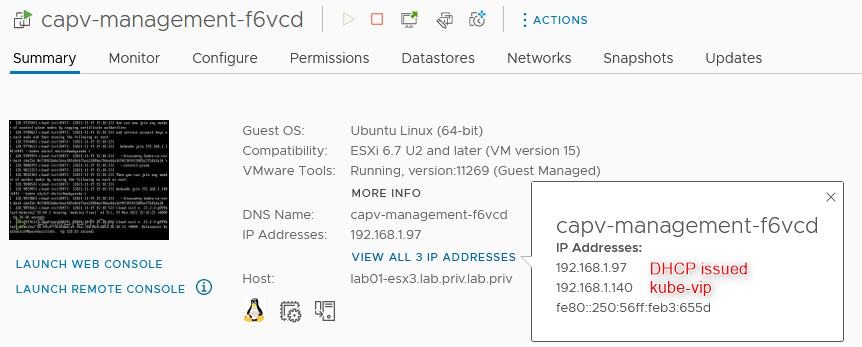
- Once the deployment is complete, the control plane VM should show whatever IP was assigned to it via DHCP and the virtual IP set by kube-vip that you specified in the config file (remember 192.168.1.140 ?).
- And if you run the clusterctl command again you should get the following output.
Note that the deployment isn’t complete yet as we need to install a CNI in our cluster for the networking aspect.
clusterctl describe cluster capv-management

- Retrieve the Kubeconfig file to connect to the deployed workload cluster.
Change capv-management to the name of your cluster if you chose something else. The file generated is what we’ll use with kubectl to connect to the cluster.
kubectl get secret capv-management-kubeconfig -o json | jq -r .data.value | base64 --decode > capv-management.kubeconfig
You can also retrieve it more easily with clusterctl with the following command:
clusterctl get kubeconfig capv-management > capv-management.kubeconfig
And if you want the following commands to run against this cluster without having to specify the kubeconfig file each time, set you KUBECONFIG environment variable accordingly.
export KUBECONFIG=~/capv-management.kubeconfig
- Check that it works by querying the hosts with the generated kubeconfig file.
They will be in the NotReady state because they don’t have networking yet (CNI).
kubectl get nodes --kubeconfig=capv-management.kubeconfig

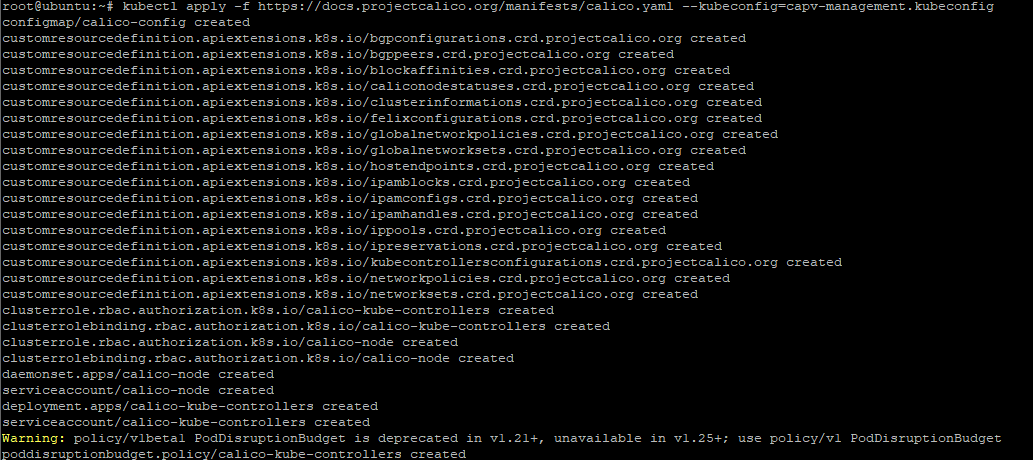
- At this point we need to install a CNI in our cluster.
I will install Calico which is a popular choice but you can choose something else, you just need the url to the vendor’s current manifest.
kubectl apply -f https://docs.projectcalico.org/manifests/calico.yaml --kubeconfig=capv-management.kubeconfig
The output of the Calico deployment looks like so:
- Check the status.
The nodes should be _Ready _after a couple minutes.
kubectl get nodes --kubeconfig=capv-management.kubeconfig

- The output of the clusterctl command should show nothing but green.
Note that you will find the names of the deployed VMs here.
clusterctl describe cluster capv-management

At this point we have a Kubernetes workload cluster running in vSphere. You can interact with it with kubectl xx yy –kubeconfig=capv-management.kubeconfig
Step 5 - Move the cluster-api components to the kubernetes cluster
Now we want to turn this newly created cluster into our permanent cluster. Meaning we need to prepare it with clusterctl and move the cluster-API components from the temporary bootstrap cluster to it. We will use the same init command but this time against the kubeconfig file of the new cluster.
- Make sure your current kubeconfig file is the new cluster with “kubectl config current-context”
- Initialize the cluster with “clusterctl init –infrastructure vsphere”
- Set your context back to the bootstrap cluster with “export KUBECONFIG=~/.kube/config”
Now we will move the components from the bootstrap to the workload cluster using clusterctl and the kubeconfig file of the workload cluster.
This step won’t work if you haven’t initialized the destination cluster beforehand.
clusterctl move --to-kubeconfig=capv-management.kubeconfig
The output should look like the following:
Performing move...
Discovering Cluster API objects
Moving Cluster API objects Clusters=1
Creating objects in the target cluster
Deleting objects from the source cluster
At this point, if the command finishes successfully, you have turned the workload cluster into a permanent management cluster. If not, it’s time to troubleshoot I’m afraid. A cause of failure I encountered was that I hadn’t prepared the workload cluster with clusterctl (because it’s not in the doc).
Step 6 - Decommission the bootstrap cluster
The bootstrap kind cluster is now back to a regular cluster, so if you can freely destroy it if you no longer have a use for it.
kind delete cluster
Wrap up
Here it is for Kubernetes Cluster API Provider vSphere (CAPV) and how to use it. We haven’t covered the creation of a workload cluster from the permanent management cluster but you already saw how to do it so it shouldn’t be too much of a stretch to figure that one out.
I shall get your attention on the fact that you want to sanitize your config files after use to avoid leaving passwords in clear text on a machine (you know.. as a best practice).
Cluster API is a great project that opened the door to many use cases for companies to build upon and distribute great products and I’m sure we’ll see many more!