Docker in vSphere : Part 1 - Introduction
Docker in vSphere : Part 3 - Installation and configuration of Photon hosts (to come)
Overview
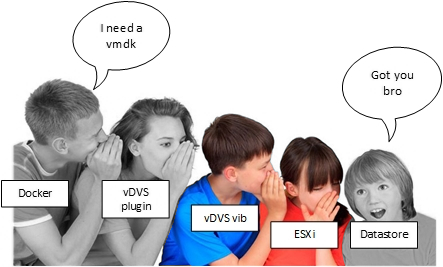
In this post we are going to prepare the ESXi hosts with vDVS to allow Docker to consume VMDK disks as volumes through the driver. We are only laying the foundations for it so we won’t talk about Docker here (see the awesome picture below).
In this post we will:
- Introduce the different components that make up vDVS.
- Install the vDVS package in ESXi.
- Configure vDVS in a multi-host configuration with storage resources constraints.
- See my Cheatsheet of the vDVS admin command (vmdkops_admin.py).
vDVS components
The vDVS driver in ESXi is made of a few different components that make its management more or less granular. vDVS is pretty easy to understand in how it works. In a nutshell: Restricted or unrestricted access to a Datastore is granted to one or more groups of virtual machines.
Here are the few main components that we are exposed to:
Config :
- SQLlite db file.
- Can be stored locally or on a shared datastore in /vmfs/volumes/”datastore name”/dockvols/”vmgroup name”/vmdkops_config.db.
- A symbolic link pointing to it is present on every host.
- Contains the list of vmgroups, vms, volumes, …
Vmgroup :
- Contains one or more virtual machines running docker with the vDVS plugin.
- Access to one or more datastores is granted to the VMs in the vmgroup.
- Docker host VMs must be added to the vmgroup to gain access to its datastores.
- Access can be restricted in terms of rights, global and per volume storage usage.
Volume :
- VMDK/-flat VMDK stored on a datastore.
- Formatted by Docker and used as mount point.
- Stored in /vmfs/volumes/”datastore name”/dockvols/”vmgroup name”/”Docker volume name”.vmdk
- Can only be created/removed by Docker
- Attached to a VM only when attached to a Docker container running inside of it.
Prerequisites
For an updated list of the prerequisites I recommend you check out the vDVS official doc as they will probably change over time. but as of june 2017 vSphere 6.0 is a minimum requirement.
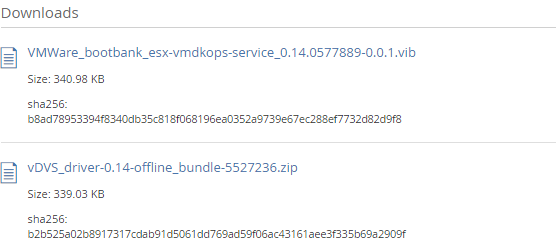
Download the latest vDVS package for ESXi here
- VIB for the manual install through the CLI
or
- Offline bundle (zip) for the VUM install
Installing the vDVS vib
The installation of the vib is just like any other vib, nothing fancy here. Note that no reboot is required. Installing with VUM makes the process more convenient and manageable, whereas using the CLI involves to log into each host but you don’t need to place them in maintenance mode. Pros and cons in each, pick your weapon. I don’t personally have a preference, though I tend to use the CLI in labs and VUM in prod/pre-prod but it doesn’t really matter.
Method 1: vSphere Update Manager
The advantage of the VUM install is that you don’t need to log on each host independently, however you will need to place them in maintenance mode for the install (again no reboot).
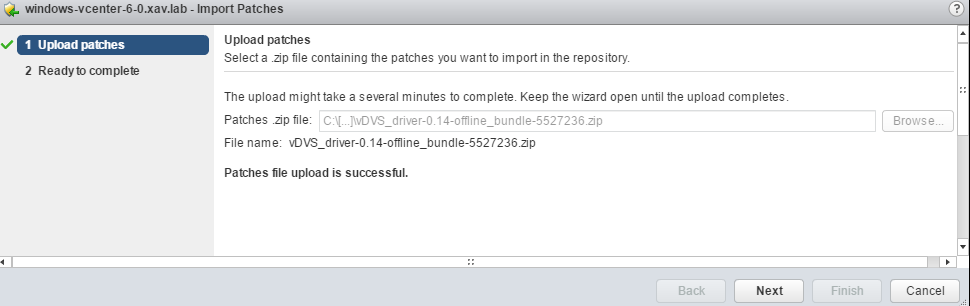
- Import the zip offline bundle in vSphere Update Manager.
- Create a new baseline of type “Host Extension” and give it a clear name and description.
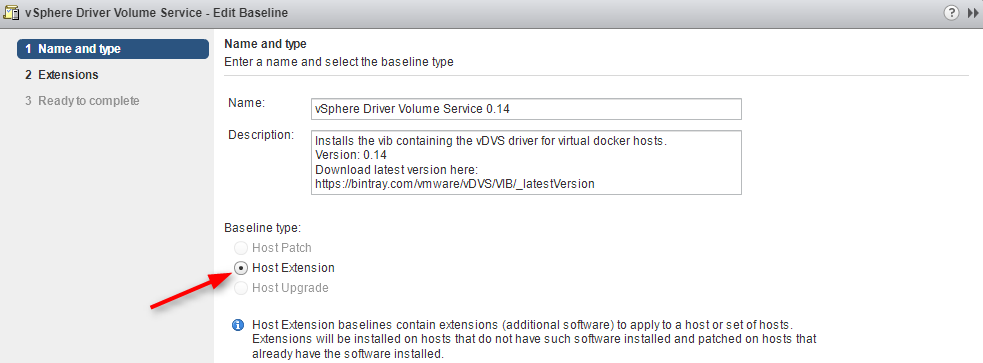
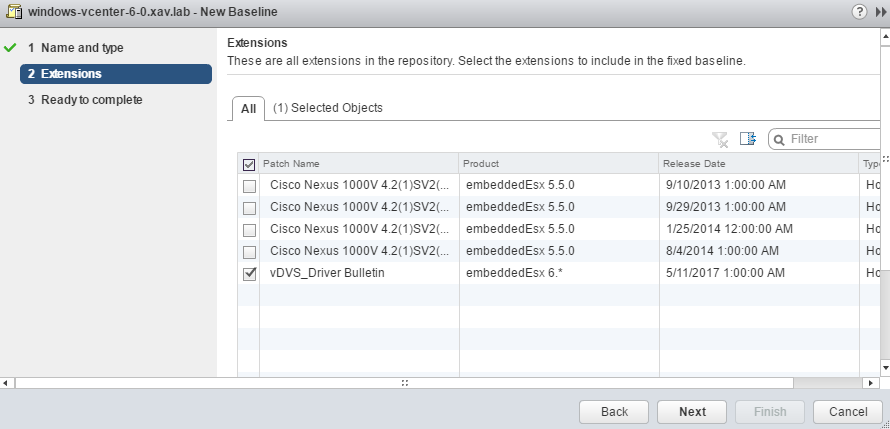
- Select only the newly added vDVS extension. Comes up as “vDVS_Driver Bulletin” in 0.14.
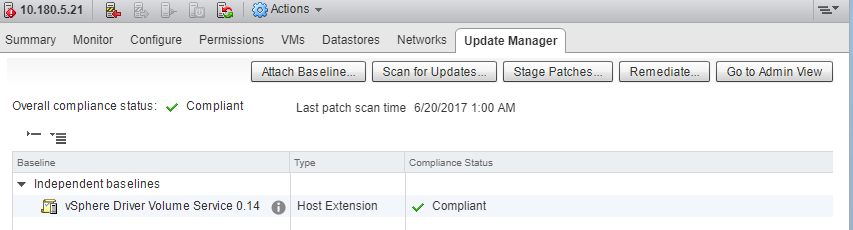
- Attach the baseline to the participating hosts (those that will run Photon hosts) and scan them, they will turn non-compliant.
- Remediate all non-compliant hosts - Remember that they need to be in maintenance mode for the package to install with VUM.
- Scan them again once the remedation is complete to get the nice green check. Done.
Method 2: CLI install
The advantage of the CLI install is that you don’t have to place the host in maintenance mode.
- Copy the vib file to a datastore or to the host’s local storage via WinSCP or the Datastore browser
- Connect to each ESXi host via SSH or VMA
- Install the vib
esxcli software vib install -v /vmfs/volumes/SHARED-Datastore/VMWare_bootbank_esx-vmdkops-service_0.14.0577889-0.0.1.vib
A successful install should look like this:
Installation Result
   Message: Operation finished successfully.
   Reboot Required: false
   VIBs Installed: VMWare_bootbank_esx-vmdkops-service_0.14.0577889-0.0.1.vib
   VIBs Removed:
   VIBs Skipped:
You can check the status of the newly installed service with:
esxcli software vib list | grep vmdkops

Configuring the vDVS driver
All the steps in this paragraph are to be performed on only one of the participating hosts (I picked my ESXIz20). The remaining ones will pick up the same config when the db is initiated.
Now that the vDVS driver is installed on all the hosts you will find a new folder /usr/lib/vmware/vmdkops/ containing the script vmdkops_admin.py. This is the command that interacts with the vDVS daemon vmdk-opsd that we use to configure it.
ls -l /usr/lib/vmware/vmdkops/bin/

-r-xr--r--    1 root     root             0 May 11 01:40 __init__.py
-r-xr-xr-x    1 root     root         70409 May 11 01:40 vmdk_ops.py
-r-xr-xr-x    1 root     root         55034 May 11 01:40 vmdkops_admin.py
-r-xr-xr-x    1 root     root          7431 May 11 01:40 vmdkops_post_update.11.1.py
-r-xr--r--    1 root     root          5033 May 11 01:40 volume_kv.py
-r-xr--r--    1 root     root          9719 May 11 01:40 vsan_policy.py
- Change directory to this folder to make it easier.
[root@ESXIz20:~] cd /usr/lib/vmware/vmdkops/bin/
- When you are not sure where to go, append “ –help” to find your way out. If you read the paragraph about the vDVS driver components you already have a good idea about what to do next.
You need to prepend ./ to your commands to execute the Python script.
[root@ESXIz20:/usr/lib/vmware/vmdkops/bin] ./vmdkops_admin.py --help
Output:
usage: vmdkops_admin.py [-h] {config,status,policy,volume,vmgroup} ...

vSphere Docker Volume Service admin CLI

optional arguments:
  -h, --help            show this help message and exit

Manage VMDK-based Volumes for Docker:

  {config,status,policy,volume,vmgroup}
                        action
    config              Init and manage Config DB to enable quotas and access
                        control [EXPERIMENTAL]
    status              Show the status of the vmdk_ops service
    policy              Configure and display storage policy information
    volume              Manipulate volumes
    vmgroup             Administer and monitor volume access control
Initialize vDVS
The configuration of vDVS start with the “Initialization” of the db file it uses to span the config across hosts. You have the possibility to configure it locally (Single node) or on a datastore (Multi tenanted). The “local” init locks you down to this host, it can be useful in some scenarios but we will focus on the tenanted model here.
-
1 - Connect to any participating host via SSH
-
2 - Initialize the db on a shared datastore.
This command creates a SQLlite db file on the selected datastore and a symlink pointing to it on the host.
[root@ESXIz20:/usr/lib/vmware/vmdkops/bin] ./vmdkops_admin.py config init --datastore=SHARED-Datastore
Output:
Warning: this feature is EXPERIMENTAL
Creating new DB at /vmfs/volumes/SHARED-Datastore/dockvols/vmdkops_config.db
Creating a symlink to /vmfs/volumes/SHARED-Datastore/dockvols/vmdkops_config.db at /etc/vmware/vmdkops/auth-db
- You can check the status of vDVS.
[root@ESXIz20:/usr/lib/vmware/vmdkops/bin] ./vmdkops_admin.py status
Output
=== Service:
Version: 0.14.0577889-0.0.1
Status: Running
Pid: 67491
Port: 1019
LogConfigFile: /etc/vmware/vmdkops/log_config.json
LogFile: /var/log/vmware/vmdk_ops.log
LogLevel: INFO
=== Authorization Config DB:
DB_LocalPath: /etc/vmware/vmdkops/auth-db
DB_SharedLocation: /vmfs/volumes/SHARED-Datastore/dockvols/vmdkops_config.db
DB_Mode: MultiNode (local symlink pointing to shared DB)
- 3 - Make the db symlink persist across ESXi restarts (0.14 and lower).
In the 0.14 release the symlink pointing to the db doesn’t persist across ESXi reboots. As of July 2017, this is a bug that I reported in the issue section on vDVS’ github and that will be fixed in the next version. If you are working with a newer version you can probably skip this step. In the meantime we need to add a small script that create the symlink at startup.
- 3.1 - Edit /etc/rc.local.d/local.sh
[root@ESXIz20:/usr/lib/vmware/vmdkops/bin] vi /etc/rc.local.d/local.sh
- 3.2 - Append this short script at the end of the file before “Exit 0”.
if [ ! -e /etc/vmware/vmdkops/auth-db  ]
then
      ln -s   /vmfs/volumes/SHARED-Datastore/dockvols/vmdkops_config.db /etc/vmware/vmdkops/auth-db
fi
- 3.3 - Check the symlink persist after a host restart.
[root@ESXIz10:~] ls -l /etc/vmware/vmdkops/
Output:
total 8
lrwxrwxrwx    1 root     root            57 Jul  4 14:51 auth-db -> /vmfs/volumes/SHARED-Datastore/dockvols/vmdkops_config.db
-rw-r--r--    1 root     root          1255 Jul  4 13:44 log_config.json
Configure the vmgroup
We create a vmgroup that allows docker to create up to 5GB worth of volumes with a maximum of 200MB per volume on “SHARED-Datastore”. We will add Photon VMs to it in Part 3.
- 4 - Create the new vmgroup. We call it “MYVMGROUP” and specify “SHARED-Datastore” as the default datastore
[root@ESXIz20:/usr/lib/vmware/vmdkops/bin] ./vmdkops_admin.py vmgroup create --name=MYVMGROUP --default-datastore=SHARED-Datastore
Output:
vmgroup 'MYVMGROUP' is created. Do not forget to run 'vmgroup vm add' to add vm to vmgroup.
- 5 - Edit the access policy.
The default access policy has no restriction.
[root@ESXIz20:/usr/lib/vmware/vmdkops/bin] ./vmdkops_admin.py vmgroup access set --name=MYVMGROUP --allow-create=true --volume-maxsize=200MB --volume-totalsize=5GB --datastore=SHARED-Datastore
Output:
vmgroup access set succeeded
- 6 - Remove the default vmgroup _DEFAULT .
[root@ESXIz20:/usr/lib/vmware/vmdkops/bin] ./vmdkops_admin.py vmgroup rm --name=_DEFAULT
Output:
vmgroup rm succeeded
That’s now the vDVS configured and all the settings store in the SQLlite db file. Any new host initiated with the same datastore will pick it up automagically which will make the process of adding more hosts much quicker.
Adding participating ESXi hosts
-
Connect via SSH or your favorite method to the other participating hosts.
-
Initialize the DB and make the local symlink persistent.
Go again through step 2 and step 3 (if running 0.14 and lower)
- Check that the vmgroup “MYVMGROUP” exists (Below on my ESXIz10 host)
[root@ESXIz10:/usr/lib/vmware/vmdkops/bin] ./vmdkops_admin.py vmgroup ls
Output:
Uuid                                  Name       Description  Default_datastore  VM_list
------------------------------------  ---------  -----------  -----------------  -----------------------
0f2d53d7-091e-4b04-a6b0-1d2a43c454eb  MYVMGROUP               SHARED-Datastore
As you can see the vmgroup is already here without having to do anything.
And there you have it. the hosts are ready to receive orders from Docker through the driver. We will see how to do that in Part 3.
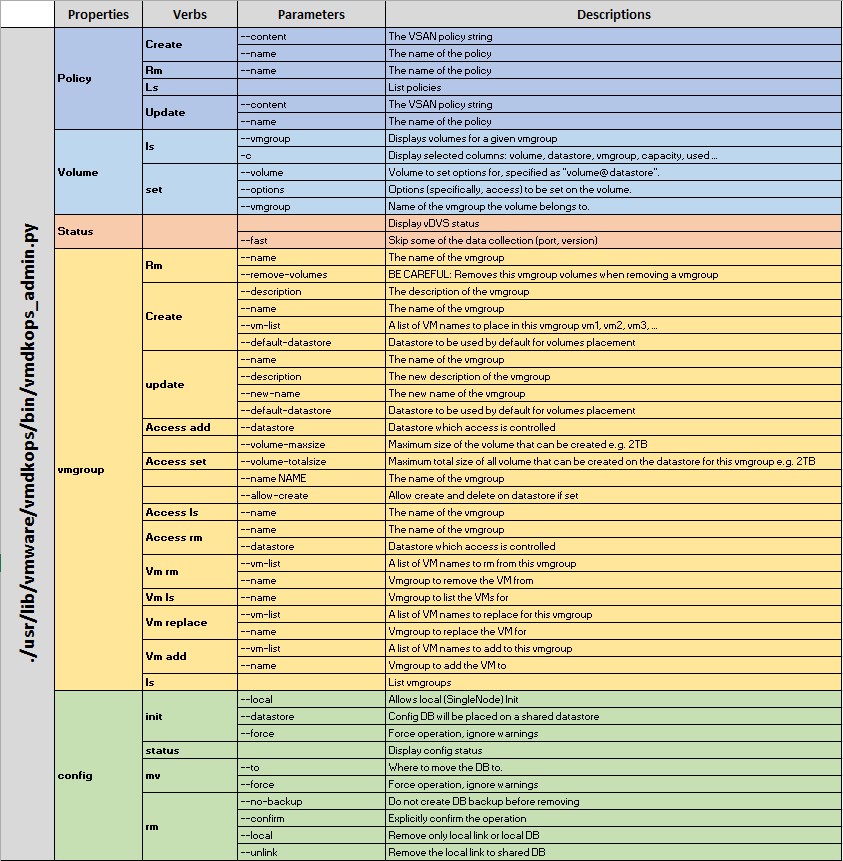
Vmdkops_admin.py cheatsheet
See below a cheatsheet of the commands you can use to manage vDVS. It might change in future versions but it is true as of June 2017.
you’ll also find the PDF version here.
Docker in vSphere : Part 1 - Introduction
Docker in vSphere : Part 3 - Installation and configuration of Photon hosts (to come)