In recent months I have been busy learning about Kubernetes and Cluster API, an open source project that lets you provision Kubernetes clusters in a declarative way from within a Kubernetes cluster (called the management cluster). I already wrote a few times about the vSphere provider (CAPV) here, here and here. There are a bunch of mature providers already available for Cluster API such as AWS, Azure, vSphere, OpenStack…
In 2021, VMware put a team together to work on a new provider for VMware Cloud Director called CAPVCD (Cluster API Provider VMware Cloud Director). While CAPV (vSphere) is really cool, networking kind of lacks as vSphere is nothing more than a hypervisor. Meaning there is no Load Balancer provider so you have to rely on kube-vip, an in-cluster layer 2 load balancer to access the kube api and you don’t have service type load balancer available by default. VMware Cloud Director on the other hand, is a proper on-premise cloud provider with integration with NSX-T and NSX Advanced Load Balancer (ALB) which acts as a decoupled load balancer provider.
Difference between CSE vs CAPVCD
Container Service Extension (CSE) is an extension of VMware Cloud Director to offer self provisioning of Kubernetes clusters via the UI or a vcd-cli plugin. It works on a server/client model. I have never used it so I won’t attempt to describe it but you can find out more in the documentation.
On the other hand, CAPVCD is a component that runs in a kubernetes cluster that connects to the VCD API. From this cluster (called management cluster), you can create and manage other workload clusters by applying custom kubernetes resources that describe said clusters.
Meaning, you could deploy a first cluster in VCD using CSE, then turn it into a management cluster from which you can deploy workload clusters, and never use CSE again (for the sake of the example, I have no complaint against CSE by the way).
Technical requirements
Note that CAPVCD has a few infrastructure requirements that you need to abide by if you want to make it work without frankensteining the upstream project.
- NSX-T: You cannot use NSX-V as the APIs are fundamentaly different.
- NSX Advanced Load Balancer (ALB): The creation of the load balancer service for the kube api and other service types load balancer is done through NSX ALB Service Engines. You cannot use the native NSX load balancer.
- VCD API v36: VMware Cloud Director 10.3 is required as it is recommended to use refreshTokens to authenticate against the api instead of username/password. Although it will work with an older version if you recompile the code after changing the API version requirements, a useful trick if can’t afford to upgrade yet.
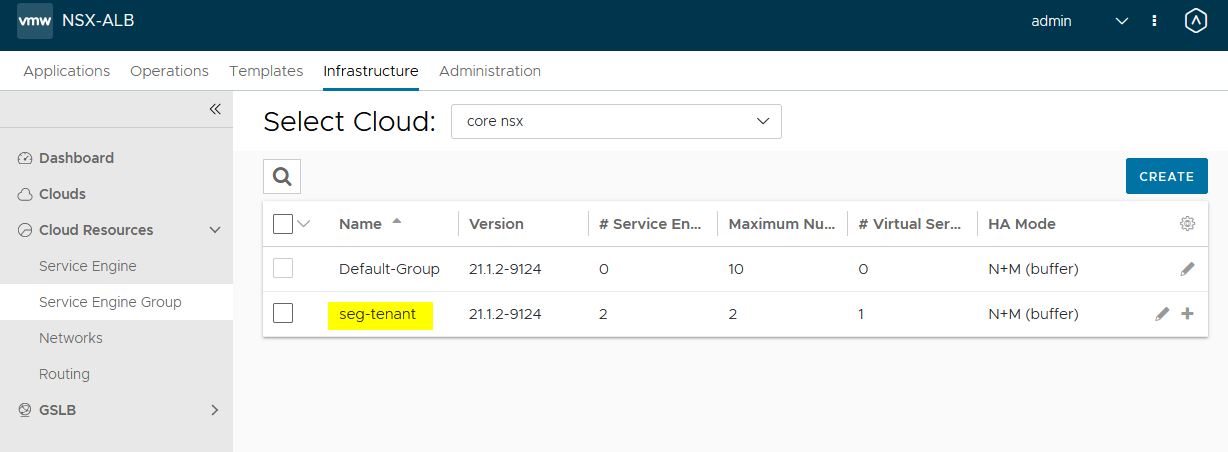
- Dedicated SEG: It is recommended to have a dedicated Service Engine Group in ALB to separate tenants. The SEG will be responsible for provisioning the service engines that will host the virtual services that load balance the traffic to the cluster.
- NSX-T resources: You must have a T1 router with:
- A segment (network) with IP allocation to connect the cluster nodes
- Load balancing must be enabled
- Create an SNAT rule to give internet access to the nodes (Cloud-init, image pulls…)
- Not really an NSX-T resource but the segment must have DNS resolution
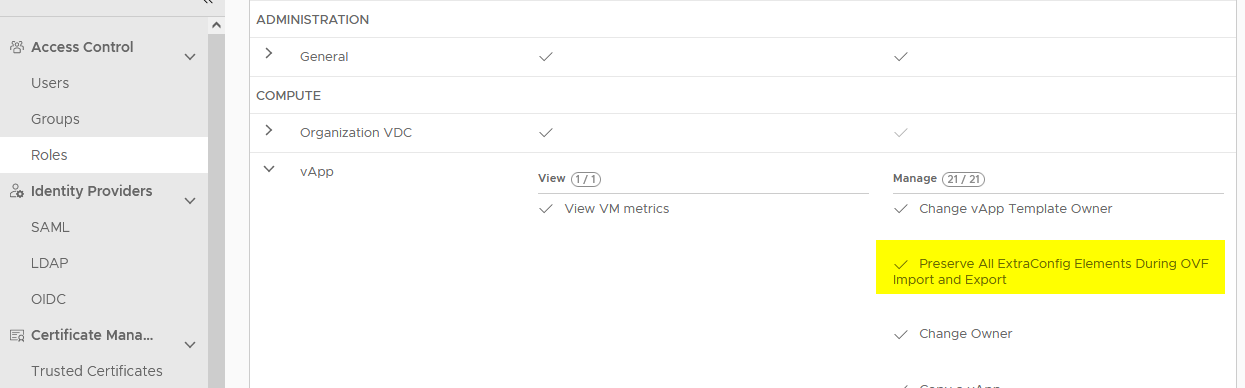
- A Kubernetes node image: You need a catalog with a template of Kubernetes. I used the image provided by VMware, you can find them in the CAPV repository or build your own with
image-builder. - API schema and rights bundle: It is recommended to register the CAPVCD API schema in VCD so you can see CAPVCD related tasks in the UI and create a capvcd user with limited permissions. If you want to skip it and use the organization admin for testing purpose, make sure to add
Preserve All ExtraConfig Elements During OVF Import and Export. Check the required permissions here.
This article assumes you already have a environment running VMware Cloud Director integrated with NSX-T and NSX ALB, as well as an OrgVDC to work with.
Preparing the environment
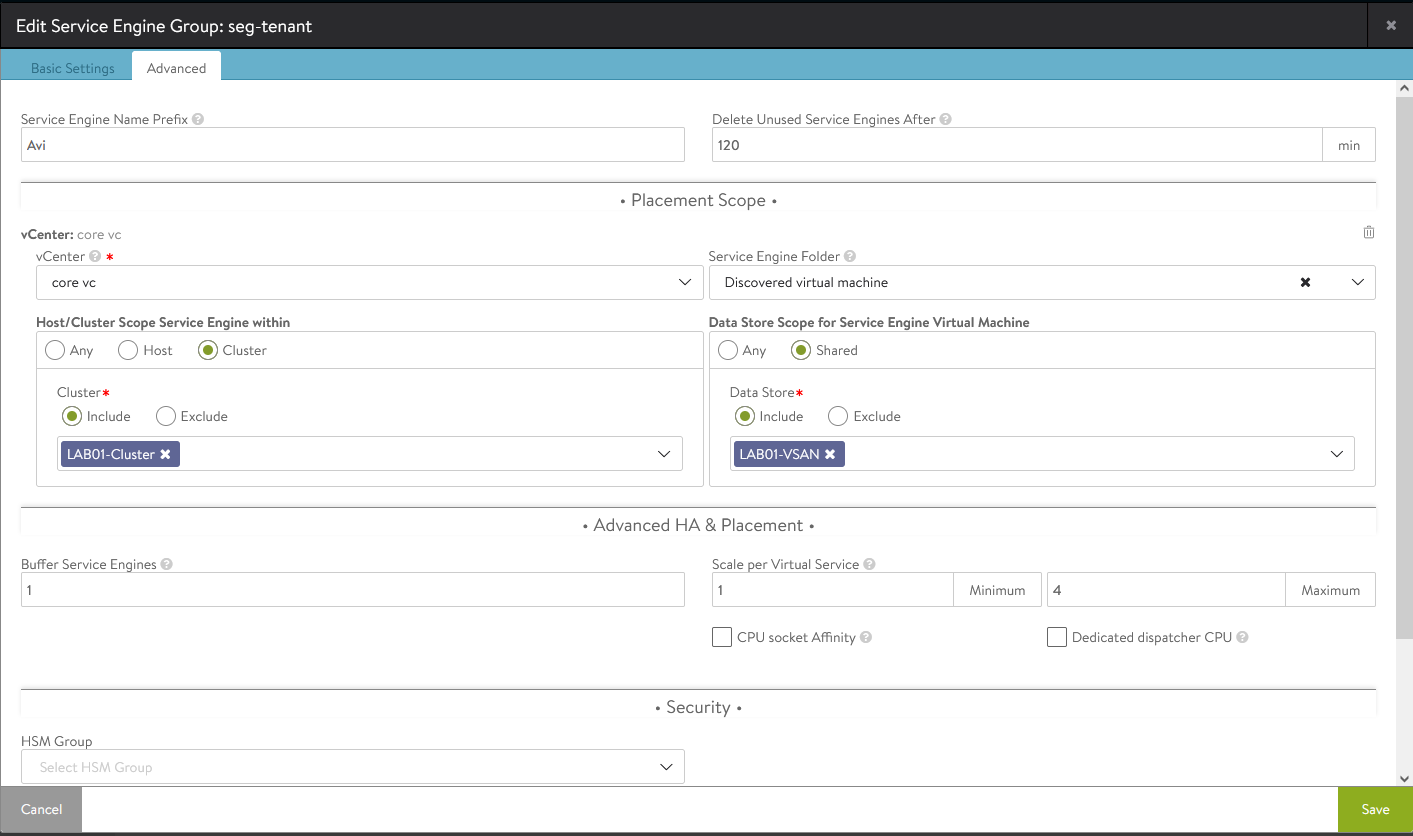
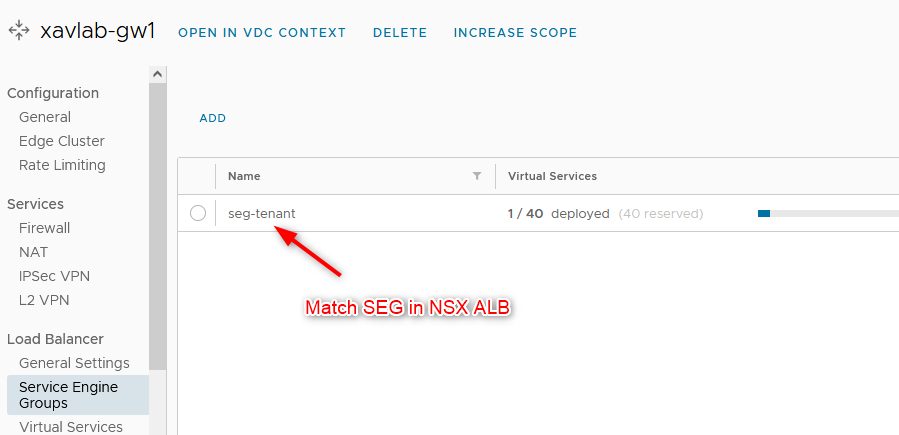
- Create a dedicated SEG in the ALB controller. I named mine
seg-tenantwhich doesn’t make much sense but it’s a test.
- The default settings should fit most test environments. However, I did change the
Max Number of Service Enginesto 2 as I have limited resources in my lab.
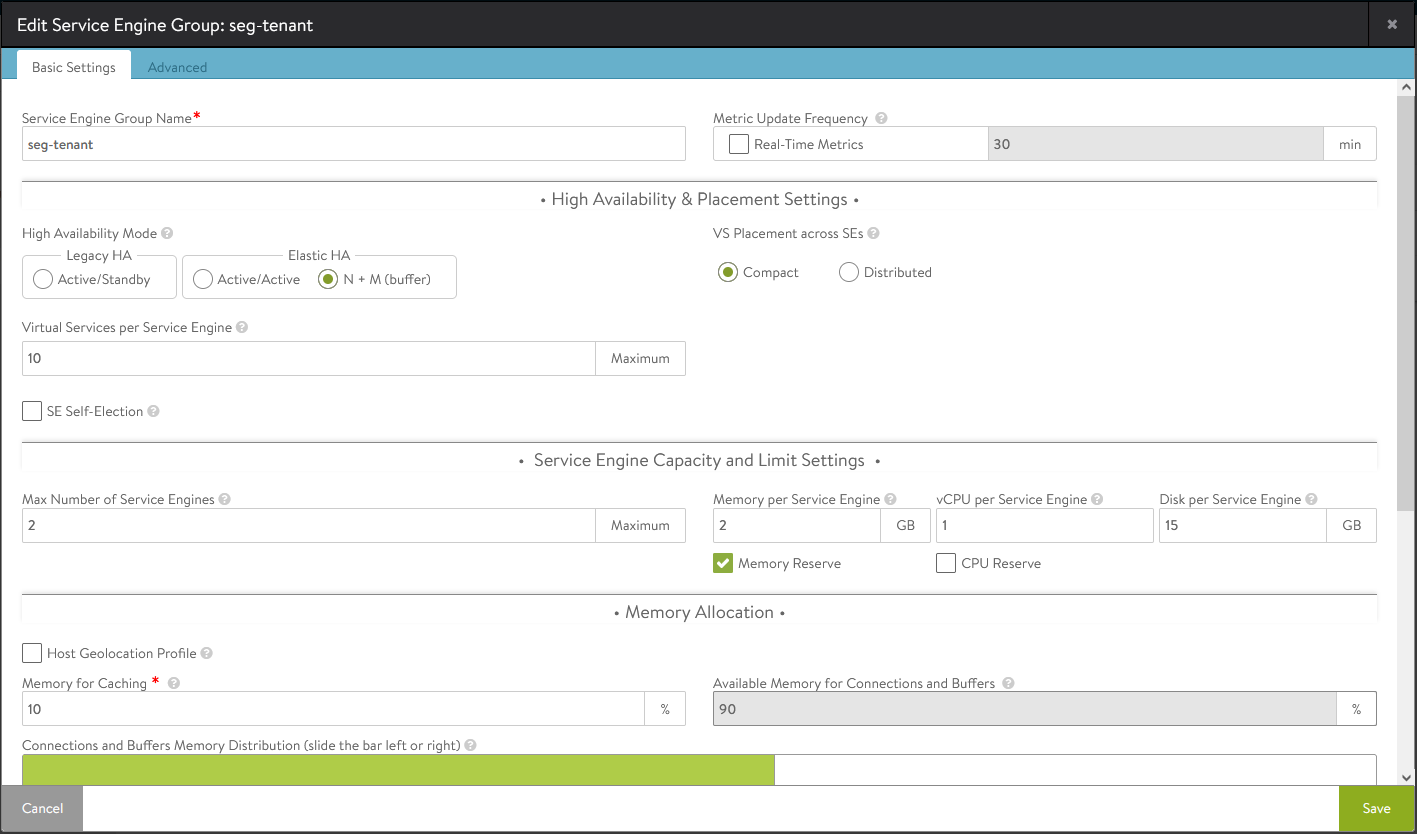
- In the advanced tab you will configure the vCenter resources where the service engines will be deployed (vCenter, cluster, datastore)
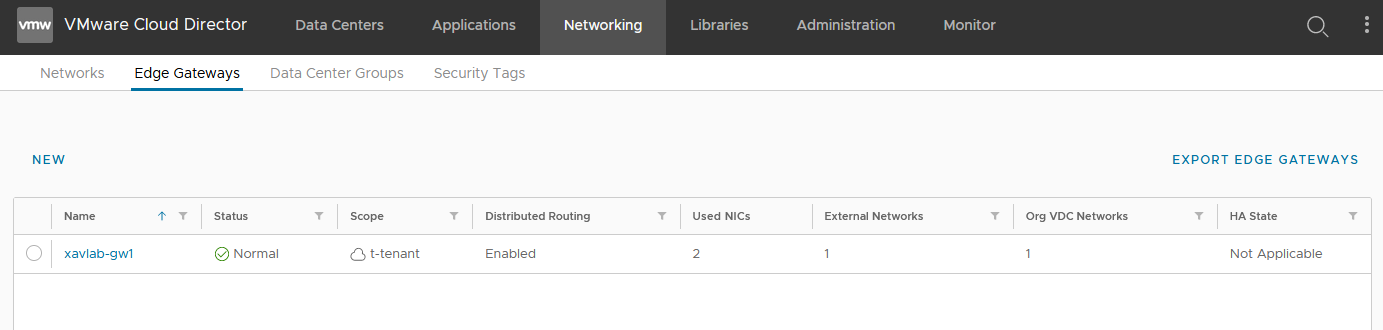
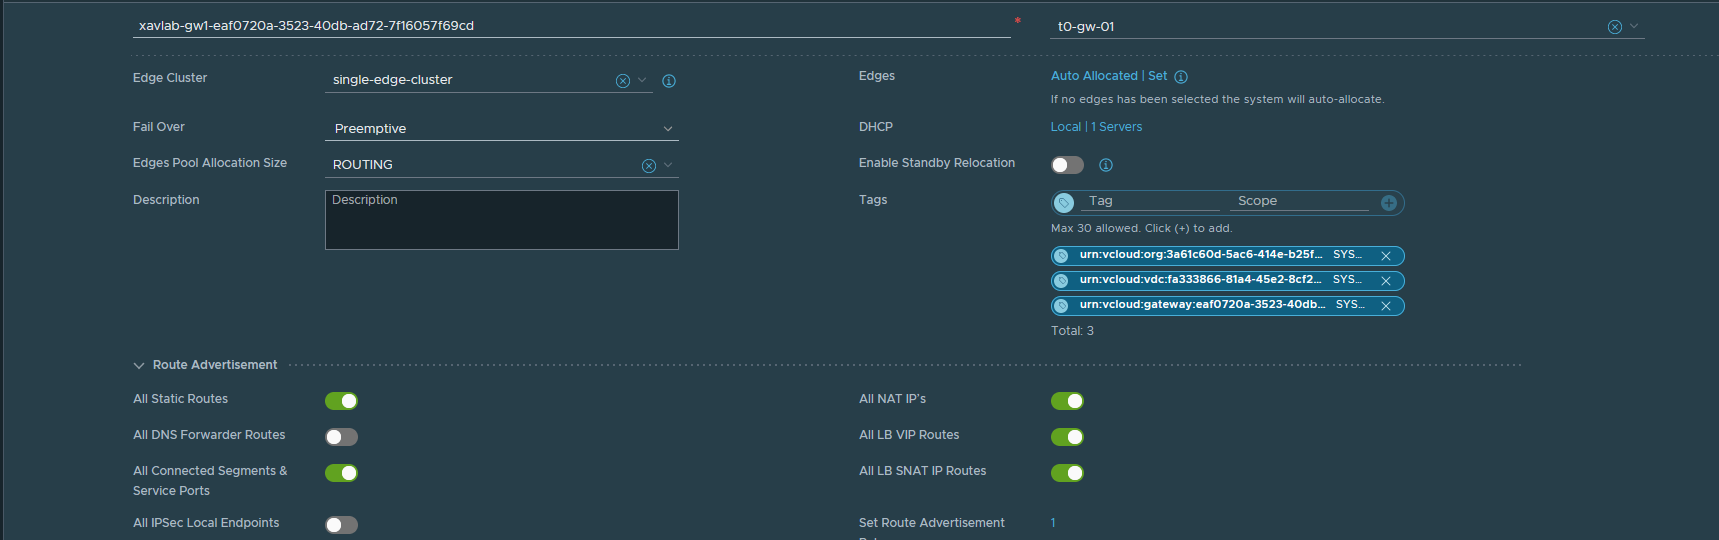
- In the tenant portal, we create an Edge Gateway (T1) that will front our Kubernetes clusters.
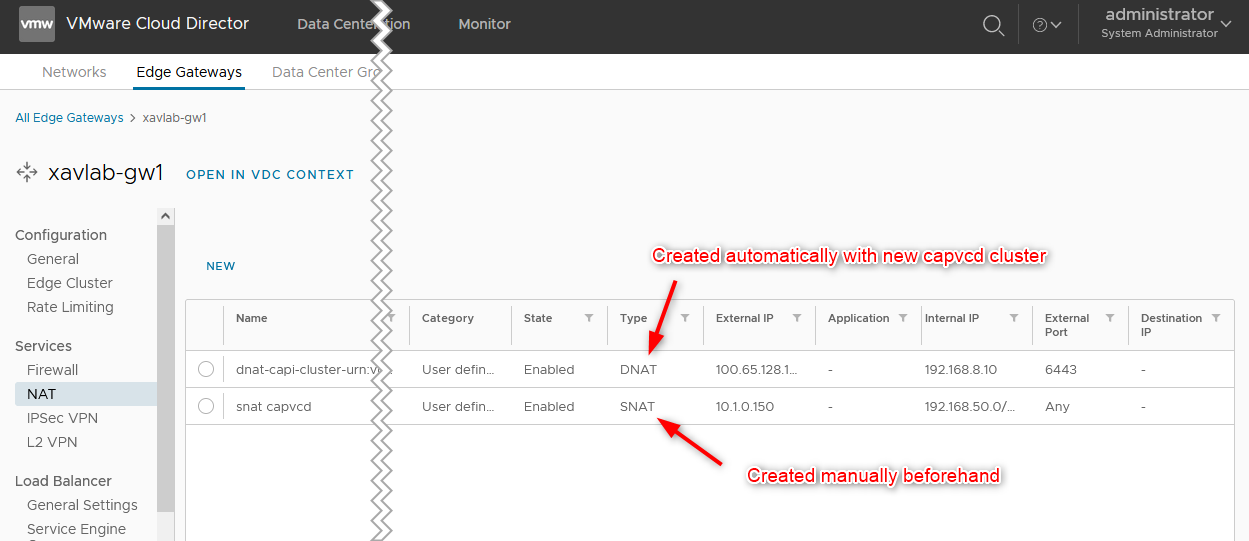
- Add an SNAT rule to allow internet access in our segment (not created yet). The internal IP in the screenshot is
192.168.50.0/24which we’ll use later when creating the segment. Don’t pay attention to the DNAT rule for now as it is created automatically when provisioning a cluster.
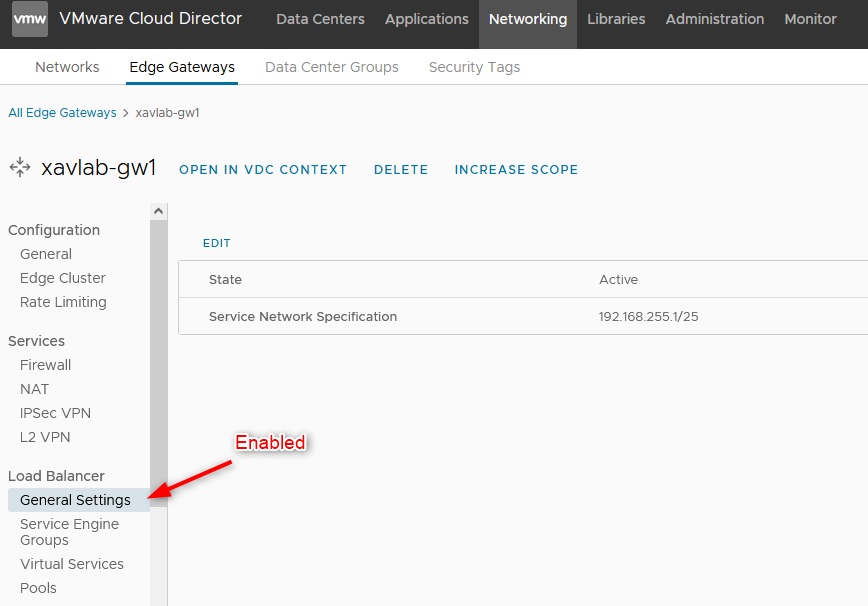
- Then, enable the Load Balancer on the Gateway, I left the default subnet.
- Under
Service Engine Groups, we add the SEG that we created earlier in the ALB controller.
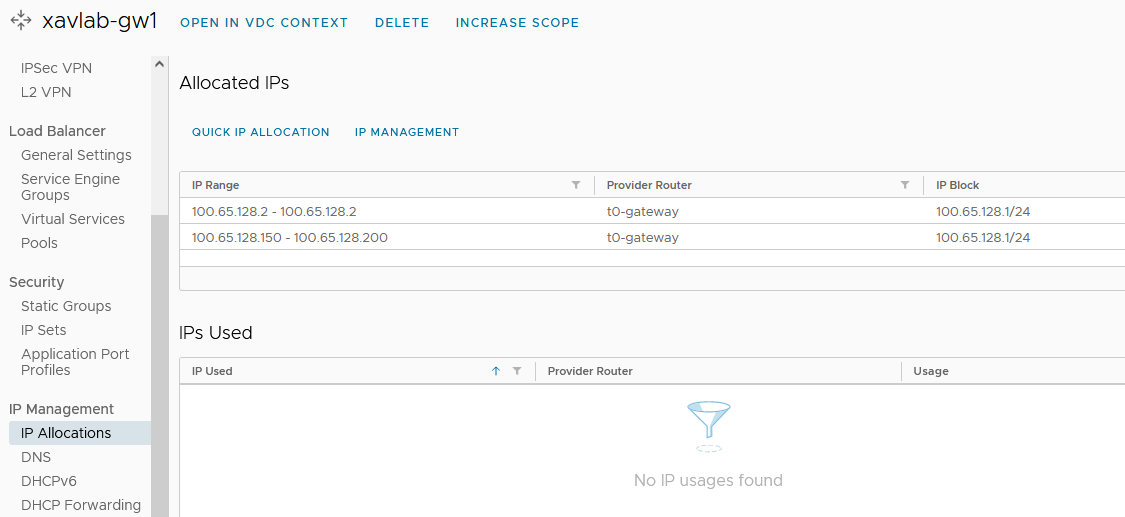
- Configure an IP block in the
IP Allocationssection. This will be used to access the services of type load balancer.
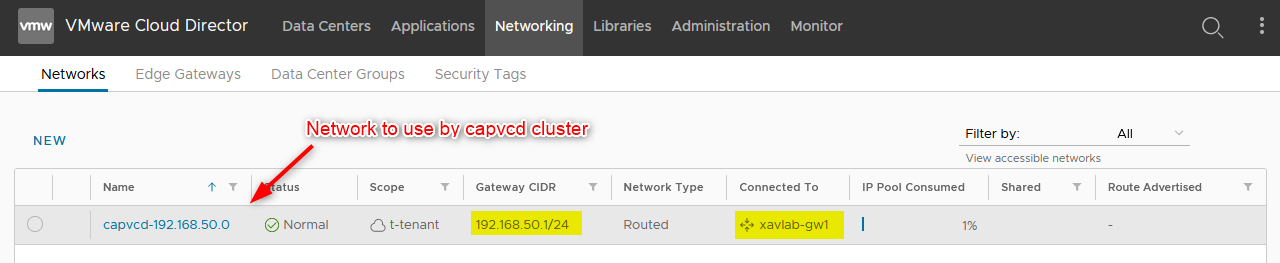
- In the
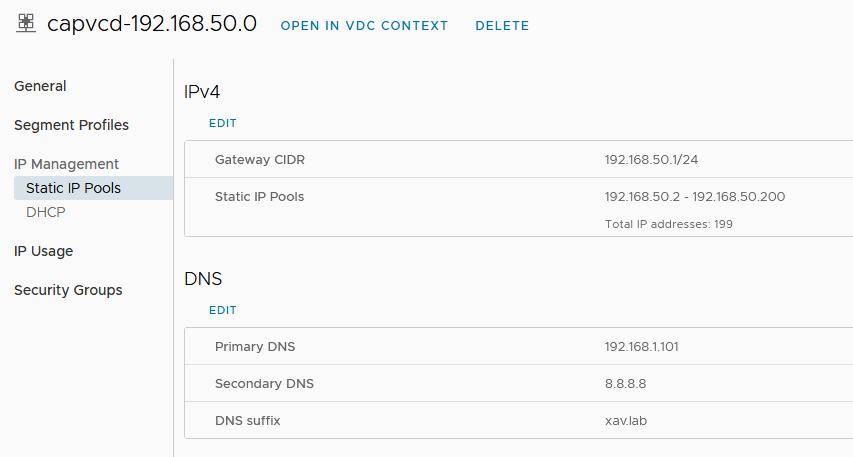
Networkstab, create a new routed network and give it the subnet you used when creating the SNAT rule.
- I configured an IP pool on it so the Kubernetes nodes get an IP when spinning up. Make sure DNS is also configured so the nodes can resolve when initializing or pulling images.
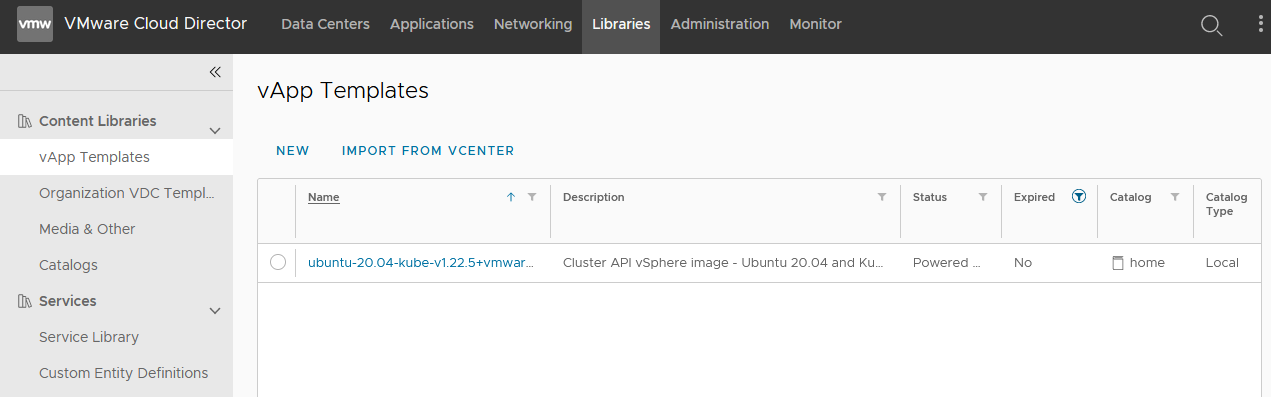
- In the
Librariestab, upload the Kubernetes OVA to an existing or a new catalog. Again, make sure you added the permission mentioned earlier to the user role.
- In NSX manager, browse to the T1 created by the VCD Edge gateway and enable Route Advertisement, otherwise the T0 router won’t know how to reach the services.
- Make sure that your upstream router has the correct routes configured as well. My NSX lab setup is not really representative of production as it is behind an OpnSense router and my management components are outside of it (accessing it through T0). Meaning I added routes in the OpnSense router and my ISP router.

If you want to check that everything works, feel free to connect a test VM in the network we created to test internet connection and name resolution.
Initializing CAPVCD
Now that the infrastructure is prepared, we will create a bootstrap cluster with Kind. This cluster will run the capi and capvcd components. It will connect to VCD and we will be able to provision Kubernetes clusters from it.
At the moment, capvcd isn’t integrated with clusterctl init yet like other providers. Meaning we have to first install the Cluster API components and then the CAPVCD controller from the manifest files. Note that clusterctl integration is in the roadmap.
It is implied that you have Git, Kind and docker installed on your machine here. We are using the 0.5.x branch of the CAPVCD repository which requires clusterctl v0.4.8 (an older version) to initiate the cluster. I already have a newer version so I just downloaded v0.4.8, chmod +x, and moved it to /usr/local/bin.
- Create a Kind cluster
kind create cluster --name capvcd
- Initiate the cluster with Cluster API.
clusterctlv0.4.8 init --core cluster-api:v0.4.2 -b kubeadm:v0.4.2 -c kubeadm:v0.4.2
The cluster API components should now be running in the cluster, we now have to install the CAPVCD components.
- Browse to a location of your choice and clone the CAPVCD repository
git clone [email protected]:vmware/cluster-api-provider-cloud-director.git
- At the time of this writing I am using the
0.5.xbranch but this will probably be outdated by the time you read this.
git checkout 0.5.x
- Configure the CAPVCD controller for initialization.
In order to initialize the cluster with our VCD server, we first need to adjust the manifest to describe the environment and the kustomization to set user credentials. Again, I’m using username/password here but it is recommended to generate a refreshToken and use it instead. Keep in mind that all this is still in early development as of the writing of this blog so things might very well be different by the time you try it yourself.
The files to edit before initializing capvcd are located in \cluster-api-provider-cloud-director\config\manager. Explanations for each line is in comments but you can compare with the screenshots showed earlier if you aren’t sure.
Future versions of capvcd will reduce the amount of configuration for the capvcd controller to only vipSubnet as the rest of it is specified in the clusters’ manifest to achieve true multi-tenancy.
- controller_manager_config.yaml
vcd:
  host: https://192.168.1.180 # VCD endpoint with the format https://VCD_HOST. No trailing '/'
  org: xav_lab # organization name associated with the user logged in to deploy clusters
  vdc: t-tenant # VDC name where the cluster will be deployed
  network: capvcd-192.168.50.0 # OVDC network where the cluster will be connected (the one you created earlier in networks)
  vipSubnet: "100.65.128.1/24" # Virtual IP CIDR of the gateway for the external network (IP block section of allocated IPs of tenant edge gateway)
loadbalancer:
  oneArm:
    startIP: "192.168.8.10" # Arbitrary first IP for one-arm load balancer (will disappear in the future)
    endIP: "192.168.8.20" # Arbitrary last IP for one-arm load balancer (will disappear in the future)
  ports:
    http: 80
    https: 443
    tcp: 6443
# managementClusterRDEId is the RDE ID of this management cluster if it exists; if this cluster is a child of another CAPVCD based cluster,
# an associated RDE will be created in VCD of Entity Type "urn:vcloud:type:vmware:capvcdCluster:1.0.0".
# Retrieve that RDEId using the API - https://VCD_IP/cloudapi/1.0.0/entities/types/vmware/capvcdCluster/1.0.0
managementClusterRDEId: ""
clusterResourceSet:
  csi: 1.2.0 # CSI version to be used in the workload cluster < By default set to 1.1.0 but it is a buggy version so use 1.2.0 instead
  cpi: 1.1.0 # CPI version to be used in the workload cluster (default)
  cni: 0.11.3 # Antrea version to be used in the workload cluster (default)
- kustomization.yaml
generatorOptions:
  disableNameSuffixHash: true

secretGenerator:
  - name: vcloud-basic-auth
    literals:
      - username="system/administrator" # VCD username to initialize the CAPVCD. If system administrator is the user, please use 'system/administrator' as the username.
      - password="MyVerySecurePassword" # Password

configMapGenerator:
- files:
  - controller_manager_config.yaml
  name: manager-config
apiVersion: kustomize.config.k8s.io/v1beta1
kind: Kustomization
- Then we are going to install the CAPVCD controller. If things go well, the controller should be running after a short while (
-knot-f)
kubectl apply -k \cluster-api-provider-cloud-director\config\default

If the pod fails to start you can display its log to help you troubleshoot the issue. For instance, the issue below shows that the controller can’t start because it can’t connect to the VCD API (because I haven’t started my homelab).

Deploying a CAPVCD cluster
Now that the CAPVCD controller is running, we will deploy a cluster to a tenant. First we need to prepare a manifest that describes the cluster and apply it to our bootstrap cluster.
- Edit the example manifest located in
cluster-api-provider-cloud-director/examples/capi-quickstart.yamland change the values related to your environment.
- cluster-api-provider-cloud-director/examples/capi-quickstart.yaml
I will only list the basic values you can change to start with. Note that I broke it down per resource and filtered out all the other fields and only left those you can change. I suggest you leave the default namespace and cluster name for now to avoid having to change it everywhere (which I did in this example) but you can do so if you wish.
apiVersion: infrastructure.cluster.x-k8s.io/v1alpha4
kind: VCDCluster
spec:
  site: https://192.168.1.180 # VCD endpoint with the format https://VCD_HOST. No trailing '/'
  org: xav_lab # VCD organization name where the cluster should be deployed
  ovdc: t-tenant # VCD virtual datacenter name where the cluster should be deployed
  ovdcNetwork: "capvcd-192.168.50.0" # VCD virtual datacenter network to be used by the cluster
  userContext:
    username: "administrator" # username of the VCD persona creating the cluster. If system administrator is the user, please use 'system/administrator' as the username.
    password: "MyVerySecurePassword" # password associated with the user creating the cluster
    refreshToken: "" # refresh token of the client registered with VCD for creating clusters. username and password can be left blank if refresh token is provided
apiVersion: infrastructure.cluster.x-k8s.io/v1alpha4
kind: VCDMachineTemplate
spec:
  template:
    spec:
      catalog: home # Catalog hosting the TKGm template, which will be used to deploy the control plane VMs
      template: ubuntu-20.04-kube-v1.22.5+vmware.1  # Name of the template to be used to create (or) upgrade the control plane nodes
      computePolicy: "" # Sizing policy to be used for the control plane VMs (this must be pre-published on the chosen organization virtual datacenter). If no sizing policy should be used, use "".
apiVersion: controlplane.cluster.x-k8s.io/v1alpha4
kind: KubeadmControlPlane
spec:
    users:
    - name: root
      sshAuthorizedKeys:
      - "ssh-rsa AAAA...WjE=" # ssh public key to log in to the control plane VMs in VCD
  replicas: 1 # desired number of control plane nodes for the cluster
  version: v1.22.5+vmware.1 # Kubernetes version to be used to create (or) upgrade the control plane nodes. The value needs to be retrieved from the respective ova. Refer to the documentation.
apiVersion: infrastructure.cluster.x-k8s.io/v1alpha4
kind: VCDMachineTemplate
spec:
  template:
    spec:
      catalog: home # Catalog hosting the TKGm template, which will be used to deploy the worker VMs
      template: ubuntu-20.04-kube-v1.22.5+vmware.1  # Name of the template to be used to create (or) upgrade the worker nodes
      computePolicy: "" # Sizing policy to be used for the worker VMs (this must be pre-published on the chosen organization virtual datacenter). If no sizing policy should be used, use "".
apiVersion: bootstrap.cluster.x-k8s.io/v1alpha4
kind: KubeadmConfigTemplate
spec:
  template:
    spec:
      users:
      - name: root
        sshAuthorizedKeys:
        - "ssh-rsa AAA...jE=" # ssh public key to log in to the worker VMs in VCD
apiVersion: cluster.x-k8s.io/v1alpha4
kind: MachineDeployment
spec:
  replicas: 1 # desired number of worker nodes for the cluster
  template:
    spec:
      version: v1.22.5+vmware.1 # Kubernetes version to be used to create (or) upgrade the worker nodes. The value needs to be retrieved from the respective TKGm ova BOM. Refer to the documentation.
- Once you are happy with the cluster manifest, apply it to the bootstrap cluster and VCD should start provisioning NSX-T (DNAT), ALB (Virtual service) and vSphere (VMs) resources.
❯ kubectl get cluster
NAME           PHASE
capi-cluster   Provisioned
You can track the status of the deployment with:
clusterctlv0.4.8 describe cluster capi-cluster

Again, if you have issues with the deployment, refer to the logs of the capvcd controller to find out more about what’s going on.
If you want to see the capvcd operations in real time, you can use stern on the capvcd controller right after applying the manifest and it will display the logs as they arrive.
Note that you can track the capvcd actions in the VCD tasks view if you applied the API schema at the beginning.
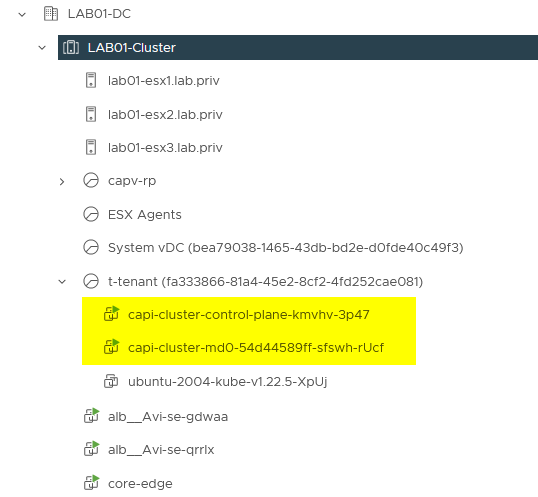
If everything went according to plan, you should see a number of new resources in your environment. Including a vAPP that corresponds to the capvcd cluster.
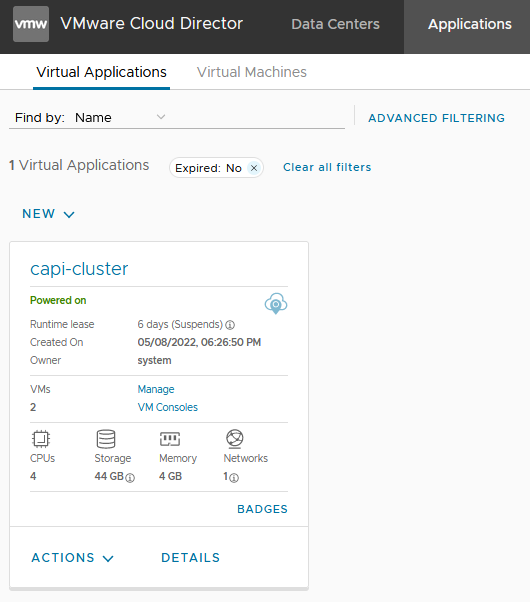
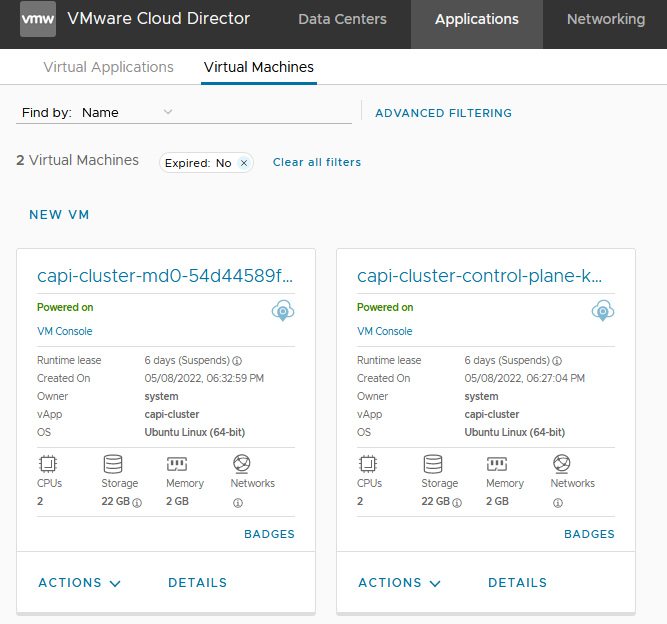
In this vAPP you find the VMs that correspond to the nodes.
You should have the dnat rule created in NSX-T.
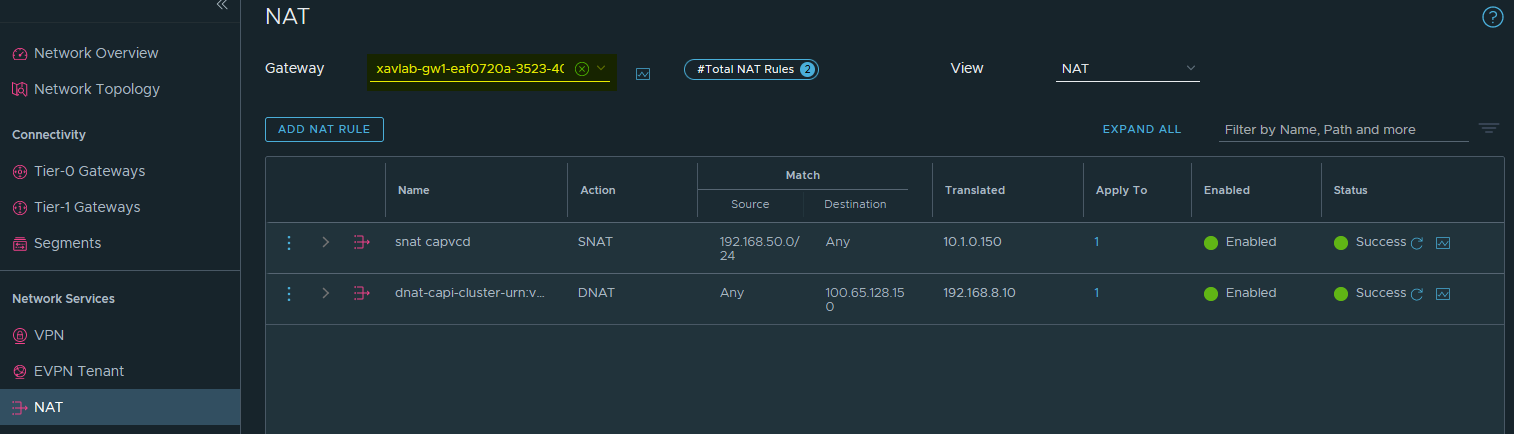
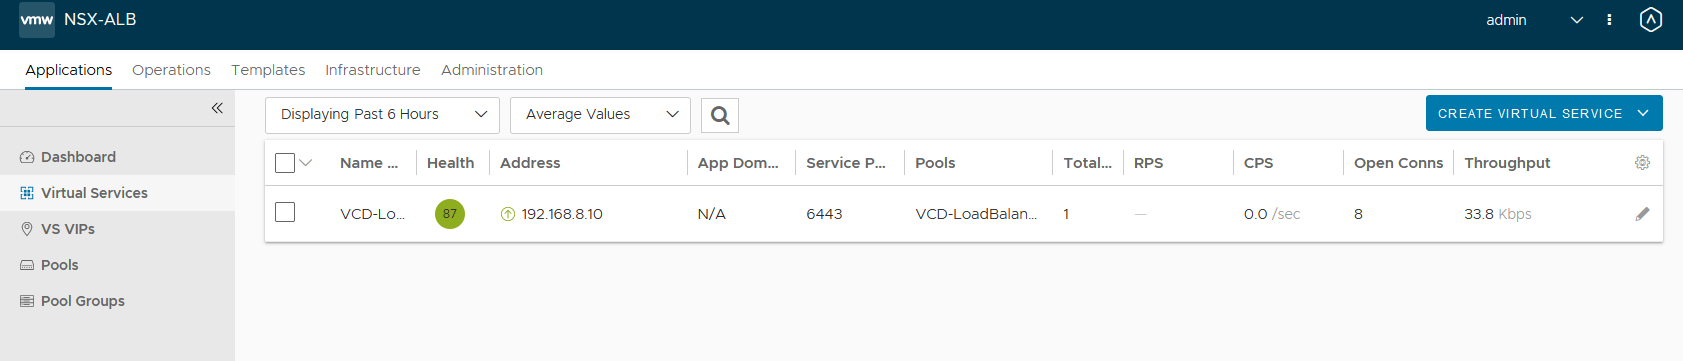
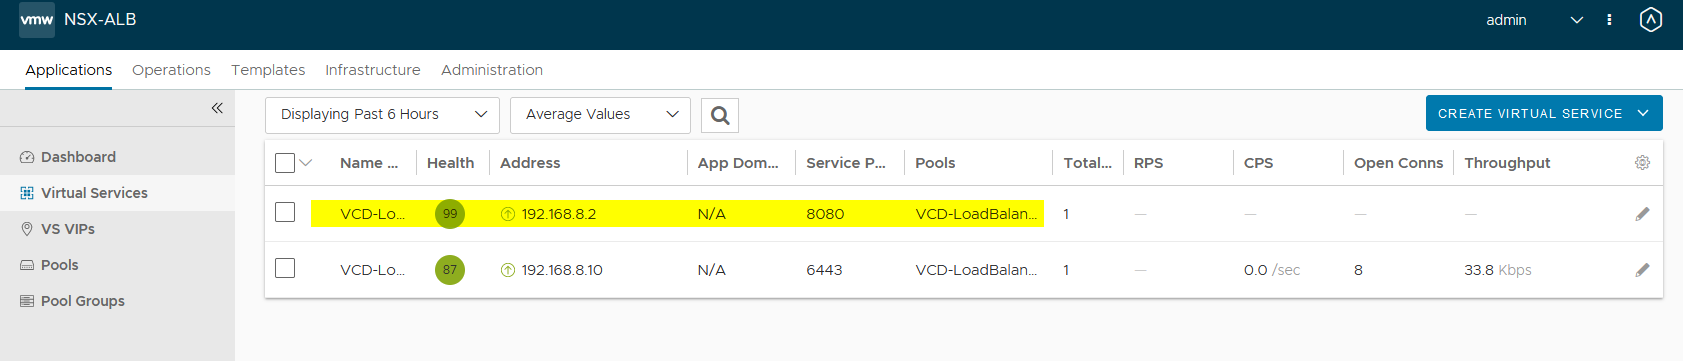
A new virtual service in NSX Advanced Load Balancer (ALB) for the Kube api load balancer.
The VMs are visible in vCenter under the tenant’s resource pool.
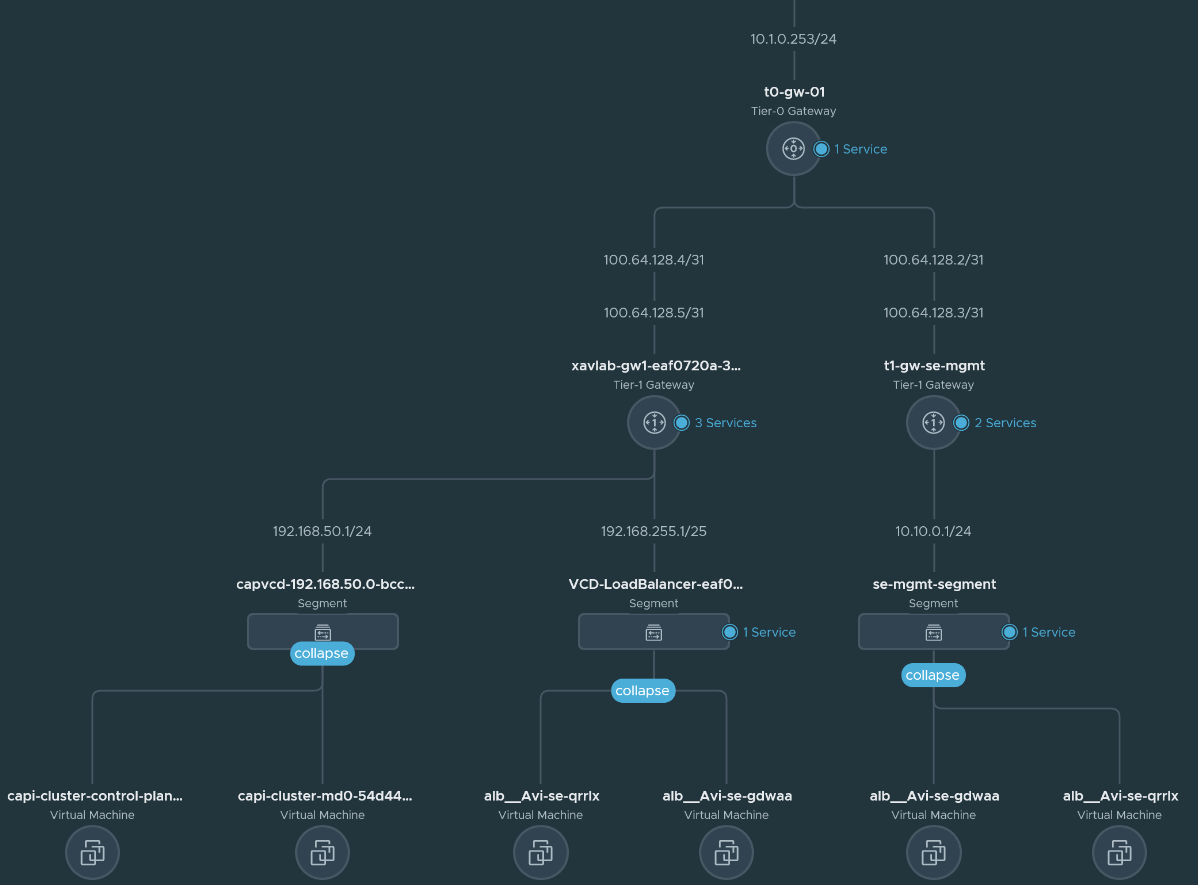
Those VMs also appear in the topology view in NSX-T under the segment specified in the cluster manifest.
Working with a CAPVCD cluster
Now that the cluster is deployed in VMware Cloud Director with CAPVCD, we need to retrieve the kubeconfig file to connect to it so we can start working on it.
- You can either use clusterctl to collect the file or parse it from the generated secret. Change the values according to your deployment of course. I will export it so all further kubectl commands are run against it.
kubectl -n default get secret capi-cluster-kubeconfig -o json | jq ".data.value" | tr -d '"' | base64 -d > /tmp/capi-cluster-kubeconfig.conf

export KUBECONFIG=/tmp/capi-cluster-kubeconfig.conf
- You can list the pods running in the newly deployed cluster. Note that they may take some time to come up but there is an open issue for that.
❯ k get pod
NAME                                                       READY   STATUS        RESTARTS        AGE
antrea-agent-8nngp                                         2/2     Running       2 (4h46m ago)   19h
antrea-agent-d5pzl                                         2/2     Running       2 (4h46m ago)   19h
antrea-controller-64bcc67f94-8cknr                         1/1     Running       2 (4h38m ago)   19h
coredns-66449dbd85-2t298                                   1/1     Running       1 (4h46m ago)   19h
coredns-66449dbd85-stlw5                                   1/1     Running       1 (4h46m ago)   19h
csi-vcd-controllerplugin-0                                 3/3     Running       3 (4h46m ago)   19h
csi-vcd-nodeplugin-xh9lq                                   2/2     Running       2 (4h46m ago)   19h
etcd-capi-cluster-control-plane-kmvhv                      1/1     Running       1 (4h46m ago)   19h
kube-apiserver-capi-cluster-control-plane-kmvhv            1/1     Running       1 (4h46m ago)   19h
kube-controller-manager-capi-cluster-control-plane-kmvhv   1/1     Running       1 (4h46m ago)   19h
kube-proxy-8ngkh                                           1/1     Running       1 (4h46m ago)   19h
kube-proxy-wbb4v                                           1/1     Running       1 (4h46m ago)   19h
kube-scheduler-capi-cluster-control-plane-kmvhv            1/1     Running       1 (4h46m ago)   19h
vmware-cloud-director-ccm-b5d58cd57-w4rcq                  1/1     Running       1 (4h46m ago)   19h
I won’t go in details in what is running here. There is Antrea that is deployed as the CNI, VMware Cloud Director CCM is the CPI and the VCD csi that lets you create persistent volumes as Independent Shareable Named Disks (I’ll talk about it in a future blog).
Let’s quickly demonstrate the CPI integration with NSX ALB by creating a service type load balancer.
- First create a test deployment with a few pods.
kubectl create deployment test-lb --image=containous/whoami --replicas=3
- Expose the deployment with a service type Load Balancer.
kubectl expose deployment test-lb --port=8080 --target-port=80 --name=test-lb-svc --type=LoadBalancer
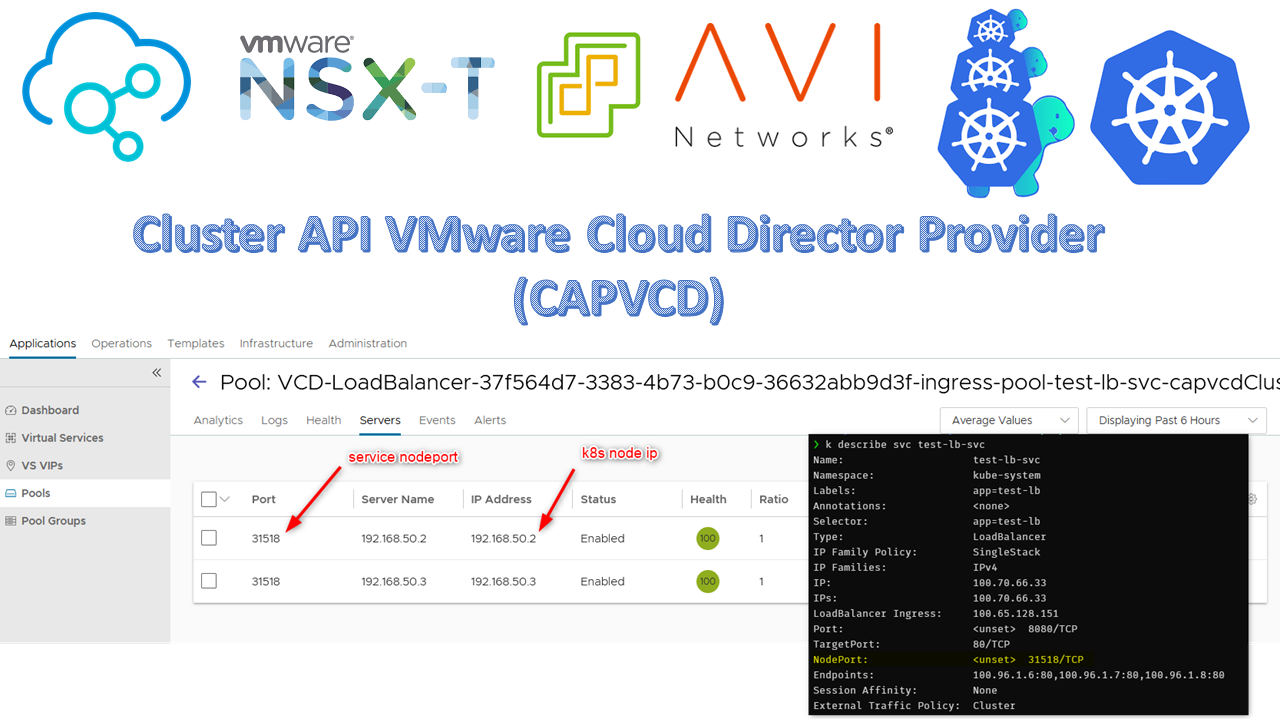
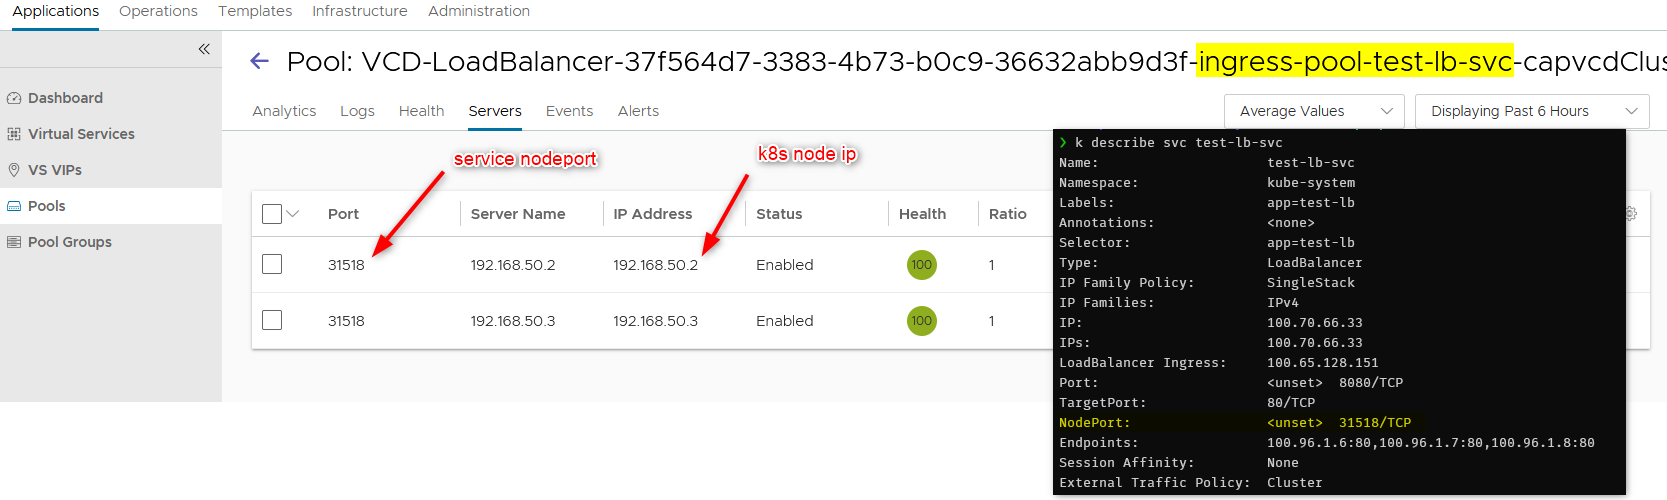
- Display the services. Here our service received an IP (100.65.128.151). You can then
curl http://100.65.128.151:8080to make sure it is load balancing.
❯ k get svc
NAME          TYPE           CLUSTER-IP       EXTERNAL-IP      PORT(S)                  AGE
antrea        ClusterIP      100.69.231.159   <none>           443/TCP                  19h
kube-dns      ClusterIP      100.64.0.10      <none>           53/UDP,53/TCP,9153/TCP   19h
test-lb-svc   LoadBalancer   100.70.66.33     100.65.128.151   8080:31518/TCP           171m
- You will find your load balancer in the virtual services in the NSX ALB controller.
- In the backend servers of the pool, you will find the nodes with their nodeports that make up the capvcd cluster.
CAPVCD management cluster
So far we worked from our Kind bootstrap cluster but this isn’t a viable solution so we want to turn the cluster we just generated into a management cluster. Very simple here, just initialize it the same way you did the kind cluster. You don’t need to clone the repo or anything as you already have it on your machine.
- While connected to the cluster we deployed, initialize it like so:
clusterctlv0.4.8 init --core cluster-api:v0.4.2 -b kubeadm:v0.4.2 -c kubeadm:v0.4.2

kubectl apply -k \cluster-api-provider-cloud-director\config\default
From now on, you can deploy, manage and delete workload clusters on VCD by applying custom resources to this cluster like we did earlier when we applied the cluster manifest.
You can then delete the kind bootstrap cluster as you won’t need it anymore, unless you want to keep switched off as a contingency plan.
kind delete cluster --name capvcd
Conclusion
Experimenting with CAPVCD has been challenging to get a nested homelab with all the infrastructure components running and integrated but it was great fun. And it is only the beginning. The contributors behind the project have a solid roadmap to bring cool features and make it more streamlined and production ready. Keep in mind that the project is still in early development stage and you may not get support if you decide to run it in production already. I will try a write about the CSI on how to create persistent volumes and attach them to pods.
Feel free to hit me up in the comments section as I’d love to discuss this with those interested to learn about environments and use cases.