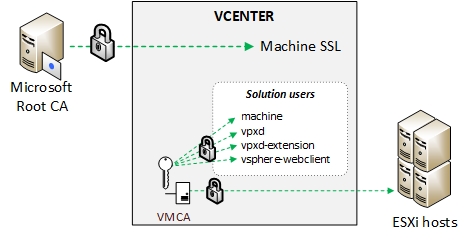
The hybrid mode is currently VMware’s recommended deployment model for certificates as it procures a good level of security while not being too cumbersome to implement. In this model only the Machine SSL certificate is signed by the CA and replaced on the vCenter server. The solution user and ESXi host certificates are distributed by the VMCA. If you look into one of them you’ll see that the end of the certificate chain is the VMCA. As opposed to the “VMCA as an intermediate CA” model where the certificate chain goes all the way up to the Root CA via the VMCA.
When playing with certificates in vCenter I read a lot of articles online but most of them were very similar and didn’t cover the whole picture: the usual gig being Generate a .csr in certificate-manager, make a request on the CA’s web page, download the cert and install it > done. Don’t get me wrong it’s still good content and for some it might be enough but most of them skipped the Windows CA part, also didn’t go all the way to the GPOs and properly identified VMCA certs.
For this how-to I tried to do something a little different than most articles stated above that would also fit my lab needs. We will cover the following:
1.Install a Microsoft standalone CA and distribute the root CA certificate via GPO.
2.Generate a certificate request in certificate manager.
3.Obtain a vCenter machine SSL certificate from the CA with the mmc (no web enrollment).
4.Install the certificate in vCenter.
5.Renew the solution users and Hosts certificates with the correct attributes.
6.Make the VMCA a trusted root CA (the mighty green lock).
Before starting make sure you have a working Active Directory and vCenter 6.5.
1. Install a Microsoft standalone CA and distribute the root CA certificate via GPO.
In this step we install a Microsoft Standalone Root CA and we set up a GPO to distribute it to the domain computers. The main differentiator of a Standalone CA compared to an Enterprise one is that it is not integrated to the domain. It means that you need to distribute the Root CA yourself to the clients. It is better suited for environment with non-AD entities and a little less flexible for admins (no templates). However I chose this one to make it a little different and the fact that it is more “manual” makes it better to fully understand how it works for people like me who weren’t born and molded by certificates.
Install the Microsoft CA
- Start Server manager and add the “Active Directory Certificate Services” role.
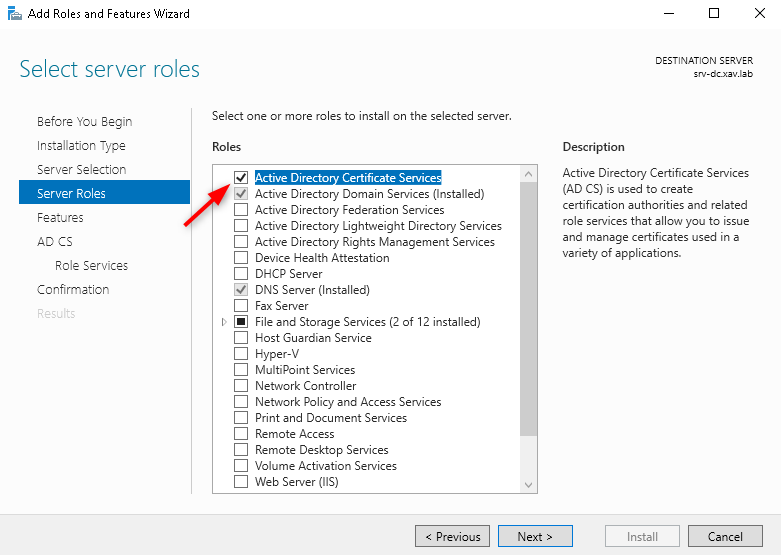
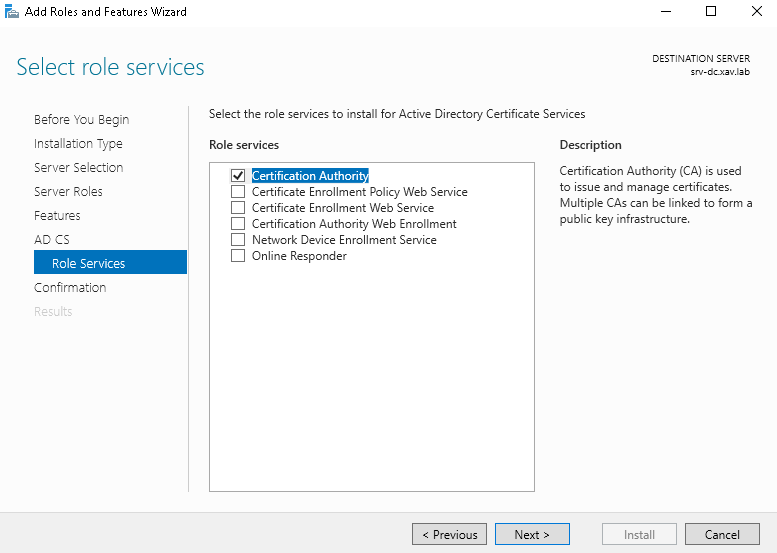
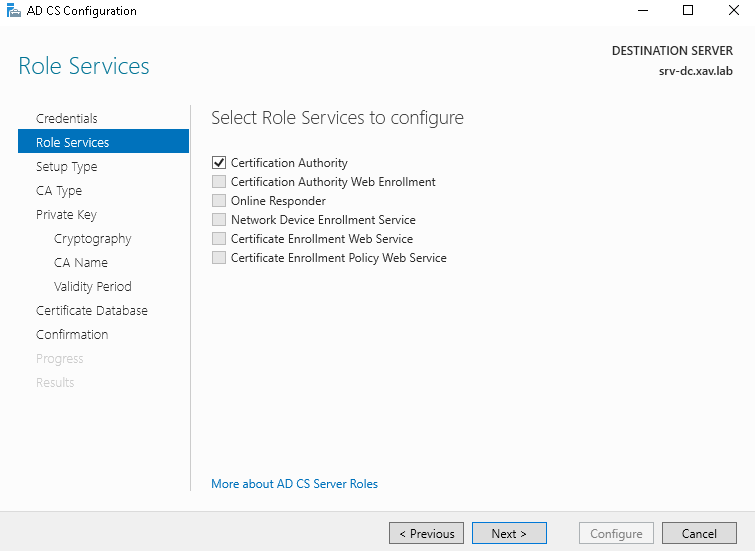
- In AD CS role services check “Certificate Authority” only.
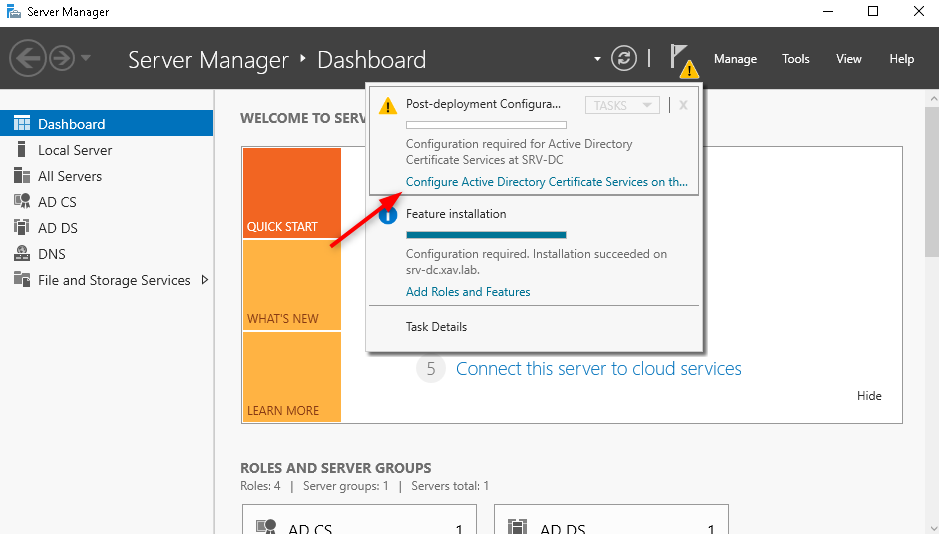
- After the role is added click on the warning flag and click on “Configure Active Directory Certificate Services …”
- I leave the domain admin for the configuration (not sure of the best practices here).
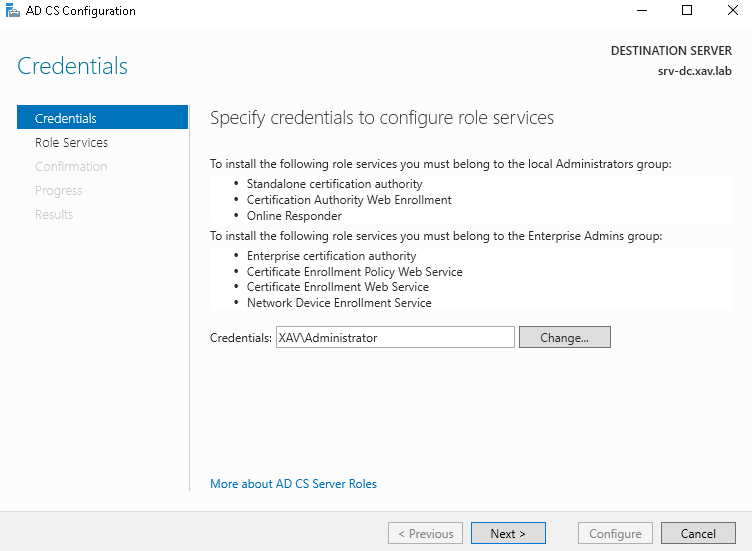
- Check “Certificate Authority” (no other choice) and next.
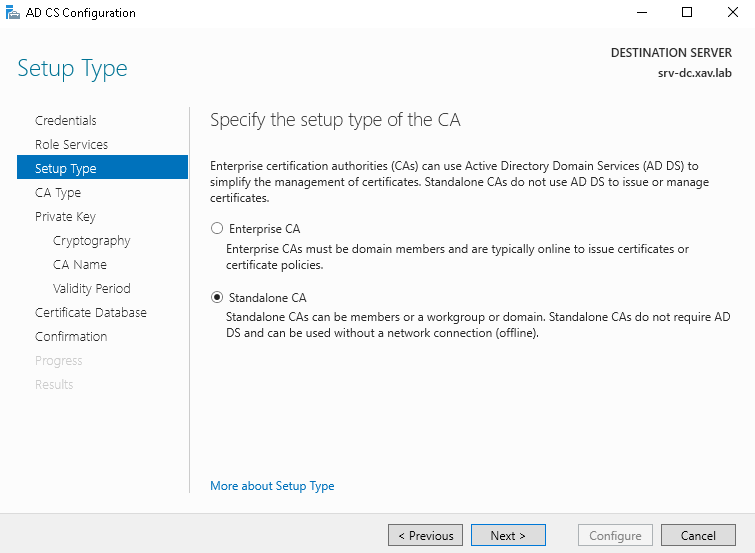
- Select “Standalone CA”
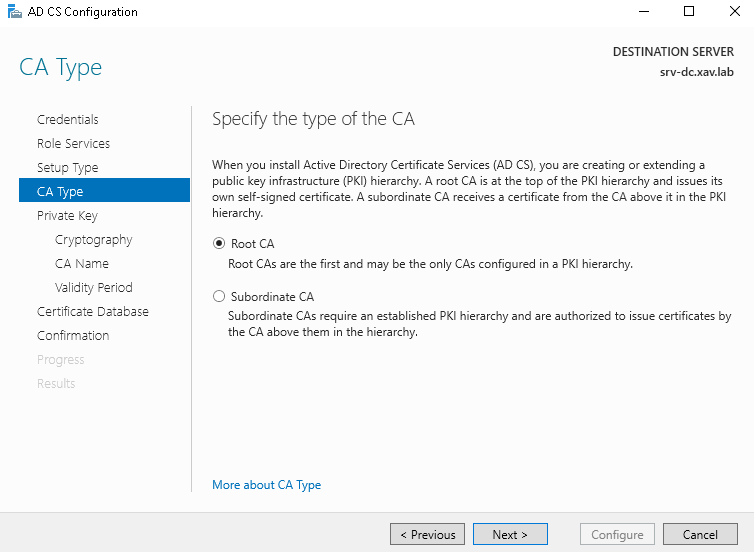
- Check “Root CA”
-
Leave “Private Key” and “Cryptography” as defaults.
-
Enter a Common name for your CA. This is the name that will appear as issuer in your client certs so don’t go too crazy on the creativity here.
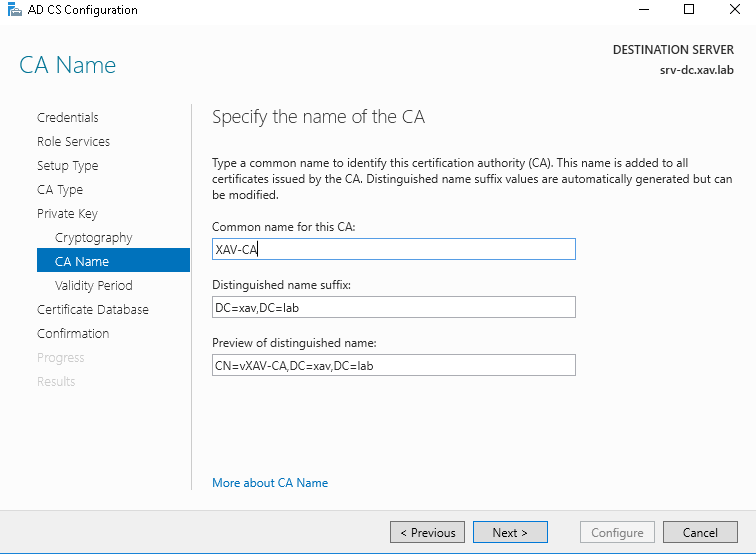
- I leave the default 5 years validy period.
Note that this is the validity of the CA, not the certificates it will sign so it should have a fairly long validity. The CA will not issue certificates with a validity longer than its own.
- The rest is good ol’ clickodrome until the end.
That’s your CA nice and shiny ready to sign some stuff.
Distribute the Root CA cert to the domain computers
This step would not be necessary if we configured an Enterprise CA as Active Directory would do it for us.
-
Start the “Certification Authority” console.
-
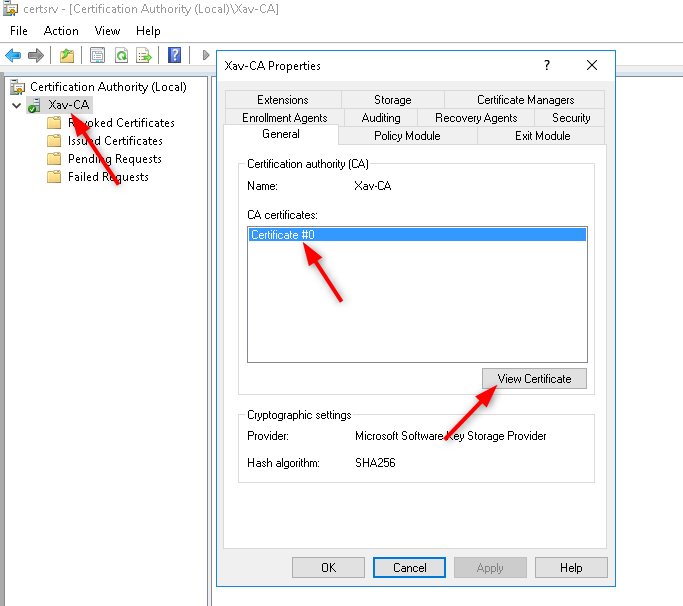
Open the properties of the CA and click “View Certificate”
- Go to “Details” > “Copy to File…” > At the file format page chose “Base-64 encoded X.509”
The Base-64 format makes it possible to open and read the certificate with notepad for example, which will be usefull when we put our certificate chain together. The Der format would just spit some crypto garbage.
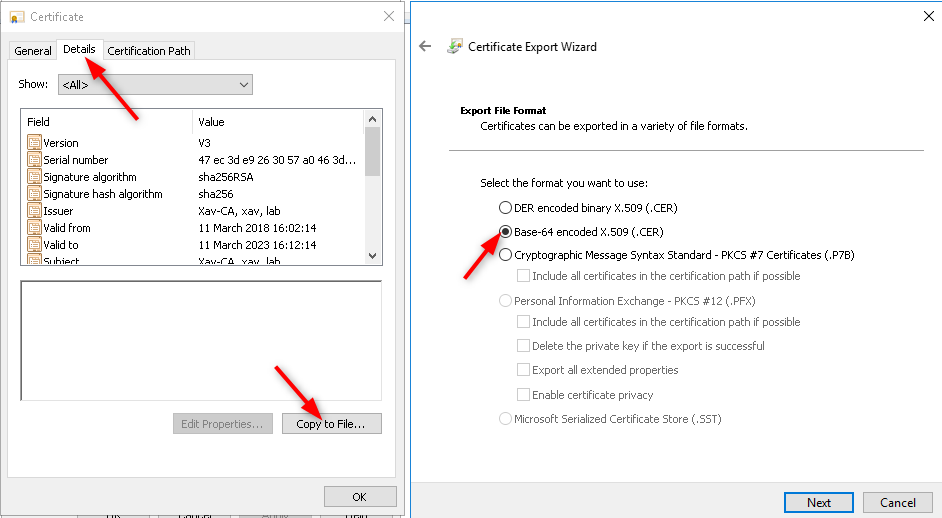
- Name it “Root.cer”, place it to the location of your choice and click finish. an “Export was successful” should appear.
Note that we will also need this cert later in step 4.
-
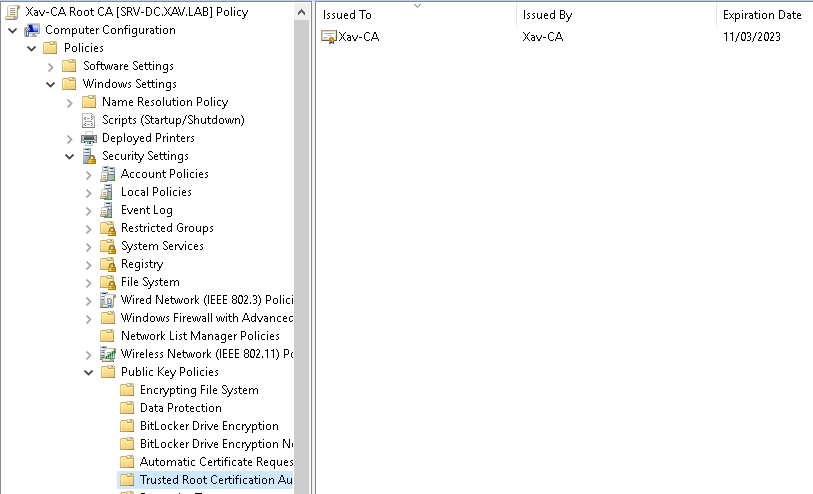
Start the “Group Policy Management” console and create a GPO linked to the domain with a descriptive name (Xav-CA Root CA).
-
Edit the GPO and browse to “Computer management” > “Policies” > “Windows Settings” > “Security Settings” > “Public Key Policies” > “Trusted Root Certification Authoriy” > Right click “Import”.
-
Click Next and Browse to the certificate location.
-
Make sure the certificate goes to the Trusted Root CA store and click Next > Finish.
-
The Root CA certificate should appear on the right pane.
-
Run “gpupdate /force” on all your systems and check that the certificate appears in Certificate Manager.
2. Generate a certificate request in certificate manager.
The certificate request is a file generally with the .csr extension containing all the properties the certificate should have and is used by the CA to generate the said certificate. There are different ways to create a csr (openssl, certmgr, some dodgy tools online) but the easiest in this case is to use VMware’s script “certificate-manager”.
Windows vCenter Server: C:\Program Files\VMware\vCenter Server\vmcad\certificate-manager
vCenter Server Appliance: /usr/lib/vmware-vmca/bin/certificate-manager
Quick troll: In my lab I work with a Windows based vCenter, that’s right!
-
On your vCenter server go to the location of your OS and start the tool. “./certificate-manager” for linux and certificate-manager.bat file for Windows.
-
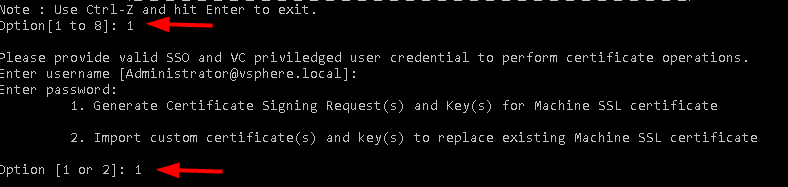
Chose option 1 > Then Option 1 again > Provide a directory to store the files > answer Y to reconfigure certool.cfg and configure your certificate.

These prompts will populate the file certool.cfg that is used to create the certificates and the certificate requests. The ones with a * must be done properly, the other ones are for certificate identification. Those don’t apply to certificates issued to the hosts.
-
Country : 2 letters of your country.
-
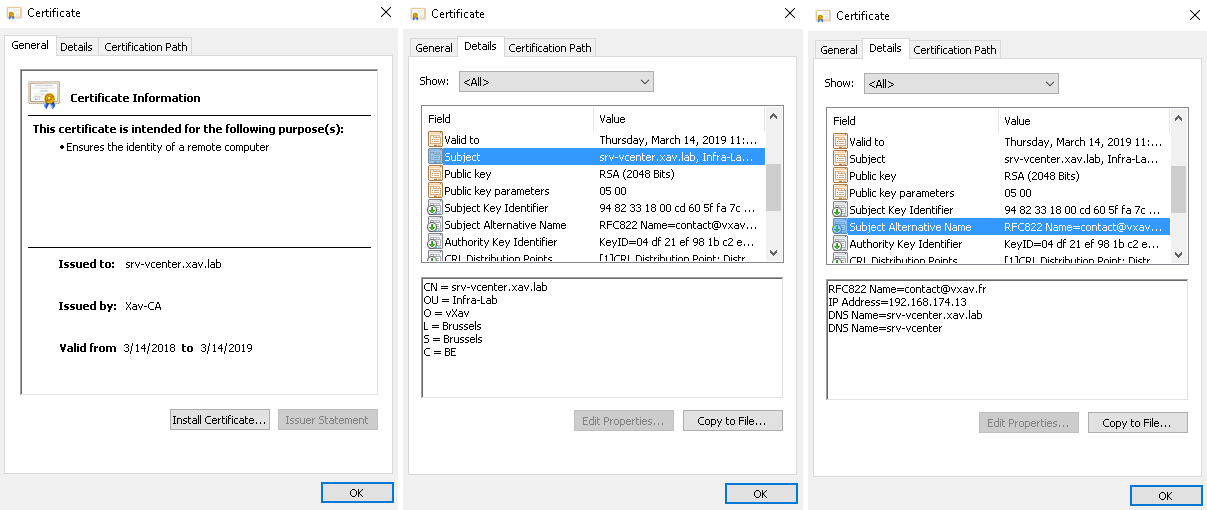
Name* : FQDN of vCenter server.
-
Organization : Name of the company.
-
OrgUnit : Organizational entity like a department.
-
State : I put the name of the city.
-
Locality : City
-
IPAddress : IP of the vCenter server. Optional, if left blank the certificate check will error when you access vCenter on its IP.
-
Email : Self explanatory.
-
Hostname* : FQDN and shortname (NETBIOS name) of vCenter server.
This field populates the subject alternative name (san) of the certificate so you don’t get an error if you use the short name instead of the FQDN.
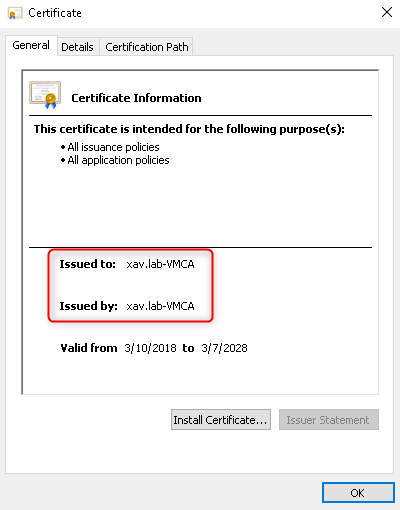
- VMCA name: Put a name that is relevant to you. It will be the issuer of the solution user certificates later on. I used “xav.lab-VMCA”.
2 files are created at the location you specified. The certificate signing request (vmca_issued_csr.csr) and the private key (vmca_issued_key.key).
3. Obtain a vCenter machine SSL certificate from the CA with the mmc (no web enrollment).
This is where I found 98% of the how-tos on internet were using the web interface enrollment. I din’t want to go down the “IIS and 100 extra features” road in order to keep my focus on vcenter and certificates. Because we can’t request certificates on the web interface we need to use certreq.
The machine ssl certificate is the certificate you see in the vSphere web client.
-
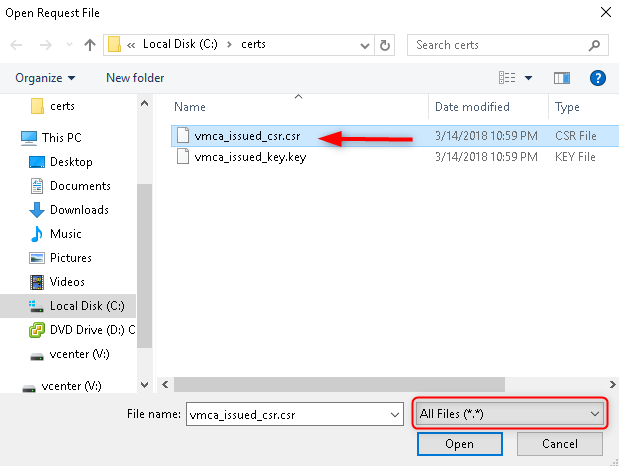
On the vCenter server start “certreq”, a file browser will open.
-
Browse to the location you specified in certificate-manager and select vmca_issued_csr.csr (set file types to “All files .).
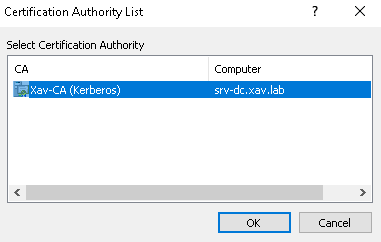
- Select your CA and click OK.
-
On the PKI server launch the “Certification Authority”.
-
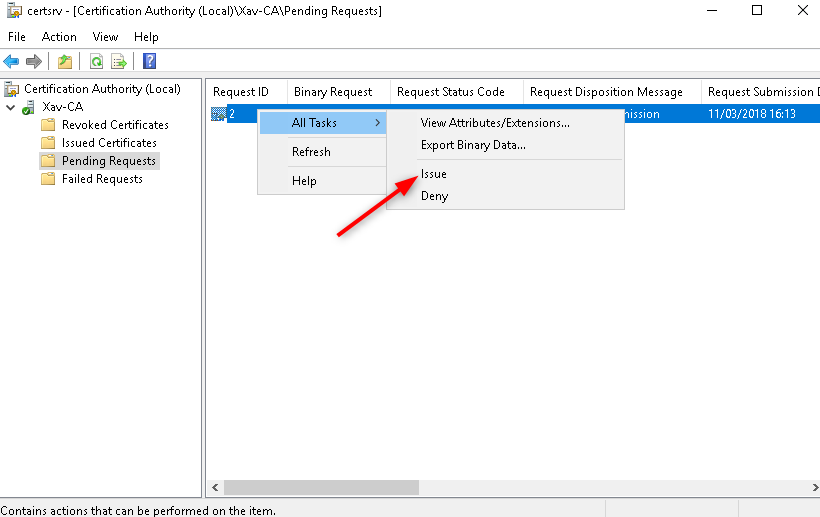
Go to “Pending Requests” > Right click on the certificate > “All tasks” > “Issue”.
-
Go to “Issued certificates” > Open the certificate like before with the CA > “Details” > “Copy to file” > Choose “Base 64 encoded X.509” and save it somewhere (I send it directly to a my vCenter \srv-vcenter\certs\srv.cer).
-
Copy the certificate of the root CA that we saved in step 1 to the same location (\srv-vcenter\certs\root.cer).
You can now close the CA we won’t need it anymore.
4. Install the certificate in vCenter.
-
Go to the location where you stored the certificates and open them both in notepad.
-
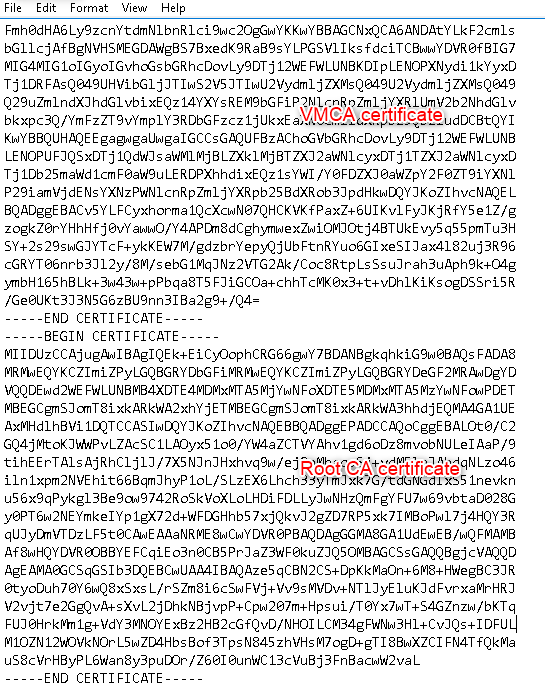
Copy the content of the CA root certificate, paste it at the end of the vCenter one (srv.cer) and save it.
-
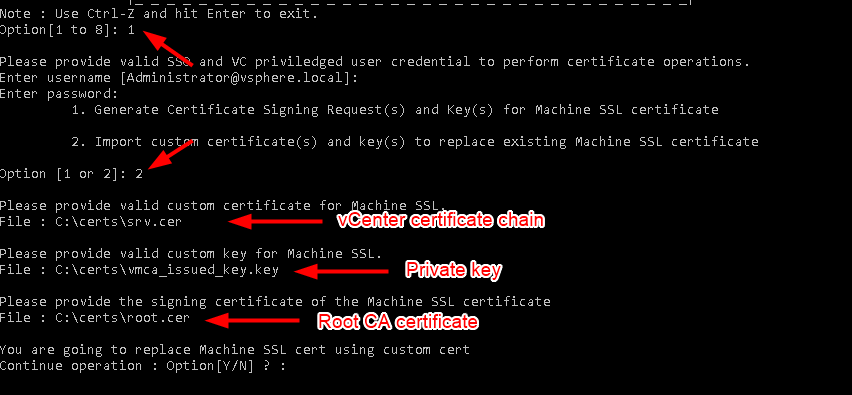
Open certificate-manager and choose option 1 again > then Option 2
-
“Custom certificate for machine SSL” > Path to the chain of certificate (srv.cer here).
-
“Valid custom key for machine SSL” > Path to the .key file generated earlier.
-
“Signing certificate of the machine SSL certificate” > Path to the certificate of the Root CA (root.cer).
-
Press Y to confirm the change and wait for it to finish.
That’s the certificate replaced in vCenter, you can now go to the web client url and you will see the certificate is valid.

In the next step we make VMCA issue certificates with the correct properties.
5. Regenerate the solution users and Hosts certificates with the correct attributes.
Renew solution users certificates
-
Start certificate-manager again and choose Option 6
-
Press Y to generate all certificates using configuration file and enter your creds.
-
Answer N to not reconfigure certool.cfg and answer Y to continue the operation.
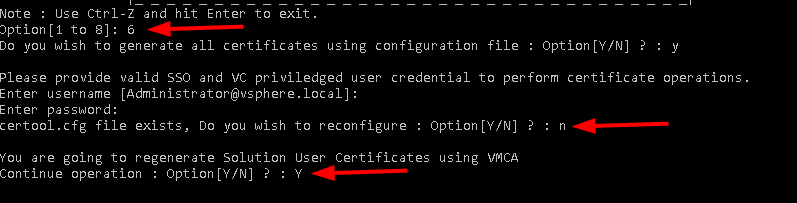
That’s now the solution certificates replaced by proper ones that you and your PKI team can identify, nice.
Renew hosts certificates
In order to edit the fields of the certificates issued to the hosts by the VMCA we need to make a few changes in the vSphere web client.
-
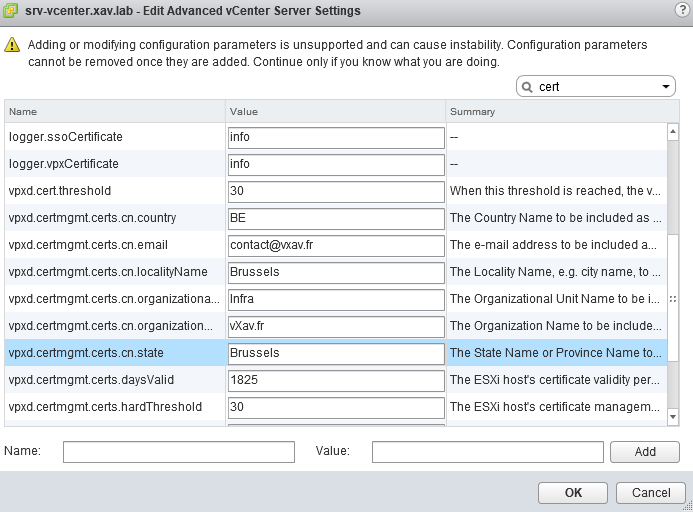
Log in the vSphere web client and select vCenter > “Manage” > “Settings” > “Advanced Settings”.
-
Type “cert” in the search bar. That will bring up all settings related to certificates.
You can customize your certificates with the settings vpxd.certmgmt.certs.cn.xxx.
vpxd.certmgmt.certs.daysValid : In case you want to change the default 5 years lifetime of the certificates.
vpxd.certmgmt.certs.cn.hardThreshold : Hard threshold for certificate expiration. vCenter Server raises a red alarm when this threshold is reached (default 30 days).
vpxd.certmgmt.certs.cn.pollIntervalDays : Poll interval for vCenter Server certificate validity checks (default 5 days.
vpxd.certmgmt.certs.cn.softThresholdb: Soft Threshold for certificate expiration. vCenter Server raises an event when this threshold is reached (default 240 days).
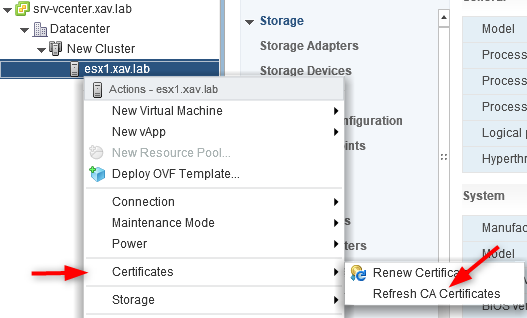
- Right click on your hosts > “Certificate” > “Refresh CA certificates”
- Right click on them again > “Certificate” > “Renew certificate”
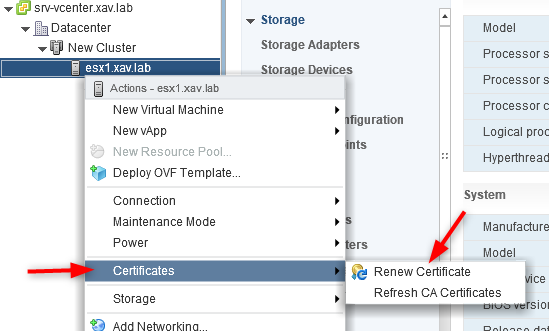
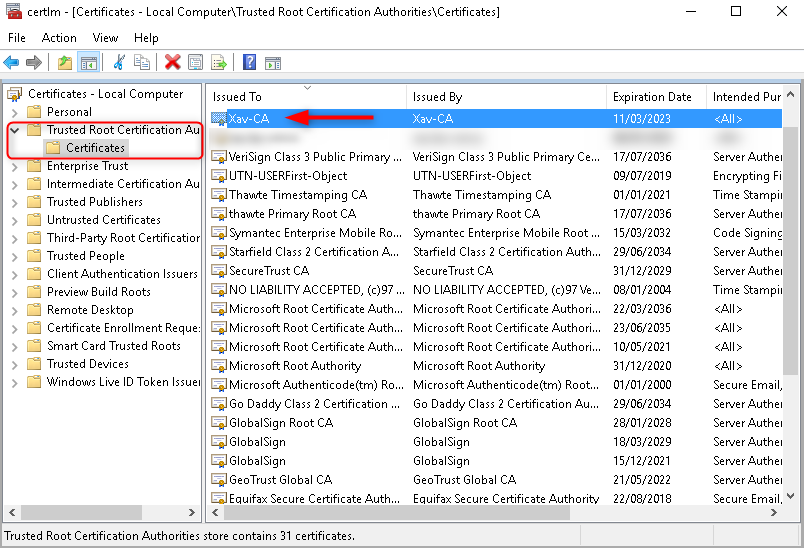
That’s it, your hosts now have certificates issued by “xav.lab-VMCA” with the fields specified previously. It might sound silly but in a security sensitive environment it can make a difference and save you from going full custom certificates (ultimate pain).
However if you log on the web UI of a host you still won’t get the beloved green lock icon in the url bar. It is because the certificate is issued by VMCA which is not known by your client, hence not trusted. In the next step we will retrieve it and deploy it via GPO.
6. Make the VMCA a trusted root CA (the holy green lock).
-
Open a browser to your vSphere web client page: https://srv-vcenter.xav.lab
-
On the right pane click “Download Trusted Root certificate” and open the zip file.
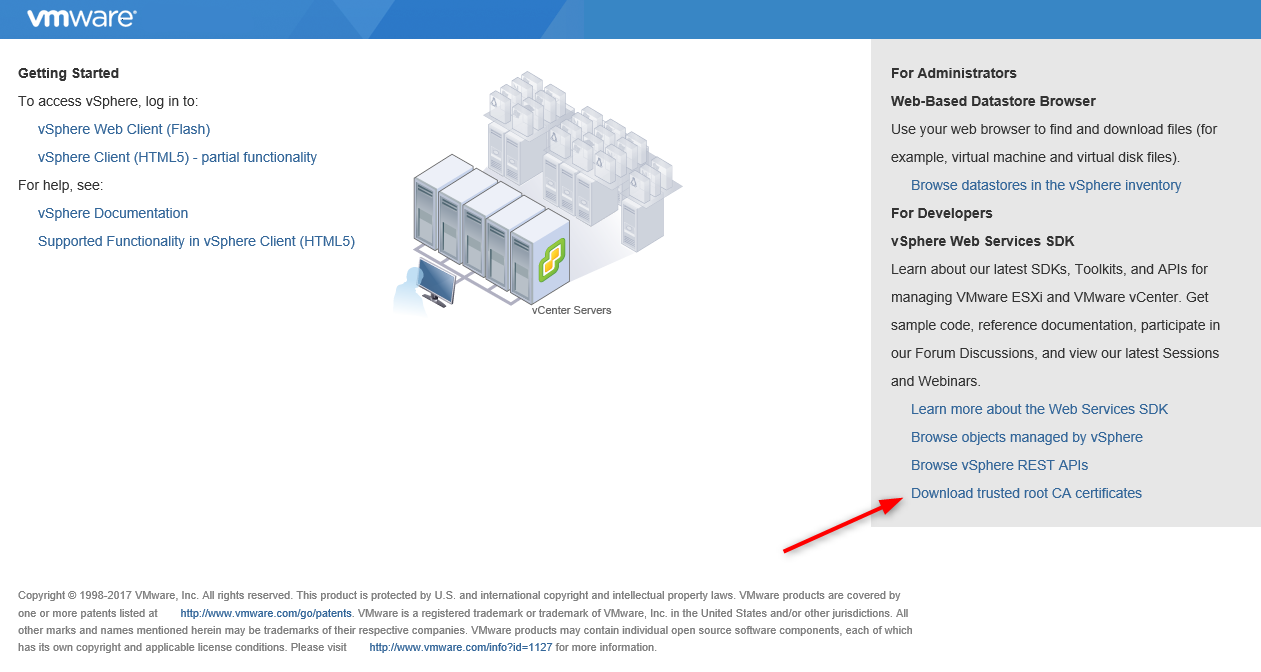
- In the “Win” folder you will find 3 certificates: the original default vmca “CA” cert, the Microsoft Root CA and our modified VMCA “xav.lab-VMCA”. Open the .crt files to locate the latter.
-
Save the certificate of the modified VMCA somewhere and copy it to your PKI server (mine is the DC).
-
Create another GPO to deploy the cert. I call it “xav.lab-VMCA”.
-
Edit it the same way we did the first time but choose the cert we just downloaded from vCenter instead.
-
Run “Gpupdate /force” on your clients and log back in vCenter.
Your connections are now secure on both vCenter AND the hosts.

Note that the certificate won’t be valid on ESXi if you connect with the IP or the short name as these are not put in the subject alternative name by VMCA.
It will be ok on vCenter unless you skipped the IP and hostname fields in certificate-manager.