I did this project to create a mood lighting behind the TV that “follows” the colors displayed on the screen and enhance the experience of movie watching. It is pretty much an open source version of Philips’ Ambilight except it can work on a wide range of devices and is much cheaper (with a little bit of hardware and some elbow grease).
Sorry for the poor quality of the video but iPhone + low luminosity doesn’t work that well. Click the gif for the full version on youtube.

The system is made up of 4 main components. I won’t get into the details of the raspberry or the TV as I assume you already have your media center running Kodi.

Here are the different components of the system and what they do.
- Hyperion : Website
Hyperion is an open source Ambilight implementation under MIT license. It is the software that controls the LEDs according to the colors detected with a clever algorithm. There are other similar projects such as Boblight but I chose Hyperion as it seems to be the best.
- Lightberry : Website
Lightberry is the hardware bit, based on an Arduino Leonardo, that acts as an interface between Hyperion and the LED strip. Lightberry offers multiple devices and packs that offer a different level of integration. In this tutorial I am only focusing on the USB converter. There is a version with a GPIO interface as well but I already have a case that closes the top of the raspberry. You could also do without the lightberry part by using the GPIO pins 19 and 23 for clock and data (See end of article for details).
This converter alone will only make the LEDs work with the Raspberry PI. If you have other devices that you would like to integrate like a DVD player or a Xbox and such you will need and HDMI switch and an HDMI splitter as well.
- OpenElec installed on a Raspberry Pi : Website
My OpenElec is on version 6.0.3 and runs Kodi 15 on a Raspberry Pi 2, at the time of this article you can get a Raspberry Pi 3 with a better hardware for about £30.
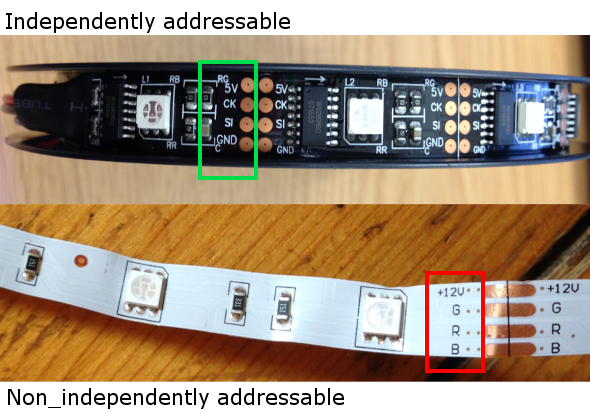
- RGB LED strip individually addressable (WS2801)
They must be individually addressable, meaning you can control the LEDs independently (color, intensity). Each LED is equipped with a micro controller, with which hyperion must be compatible. There are several types. The main ones are APA102 and WS2801, I chose the WS2801 for no real reason as I have no idea what the difference is between the two but they both seem to work well. The controller is not always visible like on the APA102, but you can check wether it is independently addressable with the labels on the strip.
- 5V, CK, SI, GND : Independently addressable
- xV, R, G, B : Non Independently addressable
I got my leds from a cheap chinese seller on amazon and I had issues with the LED strip which had the connector badly wired, so I had to redo it by desoldering and resoldering it properly, not ideal. Even though it works now it took me some time to get to figure out what was the issue, so going for the cheapest one might be a bet.
Things to get
- WS2801 LED strips.
- Lightberry USB converter - include the USB cable.
- A 5V power supply, I’ve got 4A and that works fine.
- A soldering iron
You can get the whole lot directly as a kit from lightberry. It costs about 90€ and contains everything you need. Lightberry HD Kit
Things to download
Download/install these and store the lightberry firmware somewhere on your pc.
Arduino software
[Latest lightberry firmware]http://update.lightberry.eu/
HyperCon
Java
Update firmware of the lightberry USB converter
I had an issue with a bunch a LEDs flickering like crazy all the time that is fixed by updating the firmware of the lightberry, so here it is.
Follow this tutorial from lightberry to update the firmware : http://update.lightberry.eu/
Scroll down to the end for the alternative without lightberry.
Install the LEDs
When you order the kit from lightberry you get a bunch of hooks to run the led strip sideways without using the tape on the back and the need to cut the strip at every angle. If you don’t get it there is a bit more work involved but it’s worth the time spent and costs almost nothing.
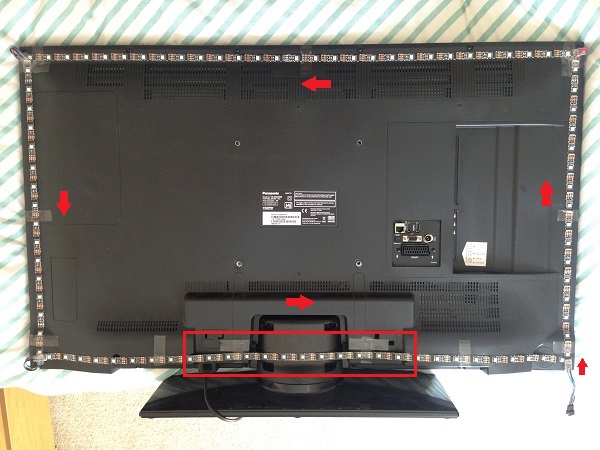
You will need to cut 4 lengths of strip for each side of the TV.
- Find where to cut your LED strip by “simulating” the placement on your TV. Mine has 16 LEDs on the left and right sides, 29 LEDs on top and bottom for 42”. Be sure to take into account that you can cut it only on the links.
- Cut the strip where you defined it.
- Solder the bits together with electric wires of about 5cm. If you have heat shrink it’ll be cleaner to protect the soldered part, I don’t have any so I just used tape.
- Take out the tape protection and stick the strip on the borders of the TV. I can remove the TV stand by just sliding it down so I ran my LED strip all the way through the bottom side and left the tape protection on the back of the strip so it doesn’t stick to the stand (Red square). But if this would prevent you from taking out the stand you need to leave a gap the size of the stand and connect the two sides with whatever 4 pins connector.
The glue on the back of the strip isn’t the best ever and the heat of the TV doesn’t help, so I added a few ugly bits of tape to secure the led strip.
(I know I know about the tape …)
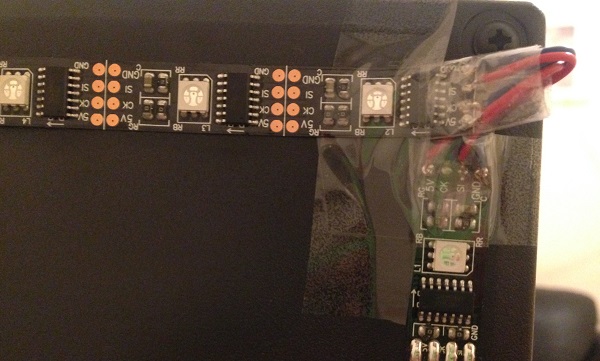
- Connect the lightberry box to the LED strip, to the raspberry pi and to the power supply.
Prepare OpenElec / Kodi
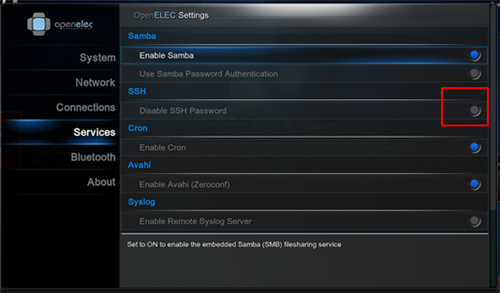
Check SSH is enabled:
- Go to “OpenELEC Settings” -> “Services” -> Uncheck “Disable SSH Password”
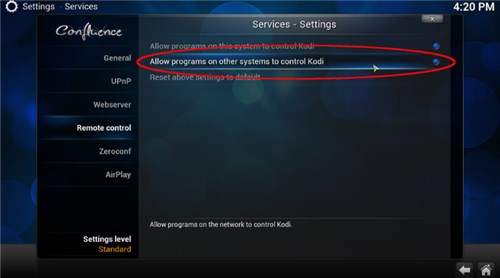
Enable remote control of Kodi
If you don’t enable the remote control, Hyperion will fail to connect to Kodi and won’t be able to switch off the leds when you don’t want them (Menu, screensaver, pause, …).
- Go to “System” > “Settings” > Set the Setting level to “Expert” > “Remote Control”
- Enable the 2 checkboxes.
Hyperion installation and configuration
Creation of the configuration
Launch Hypercon.jar and start building your configuration.
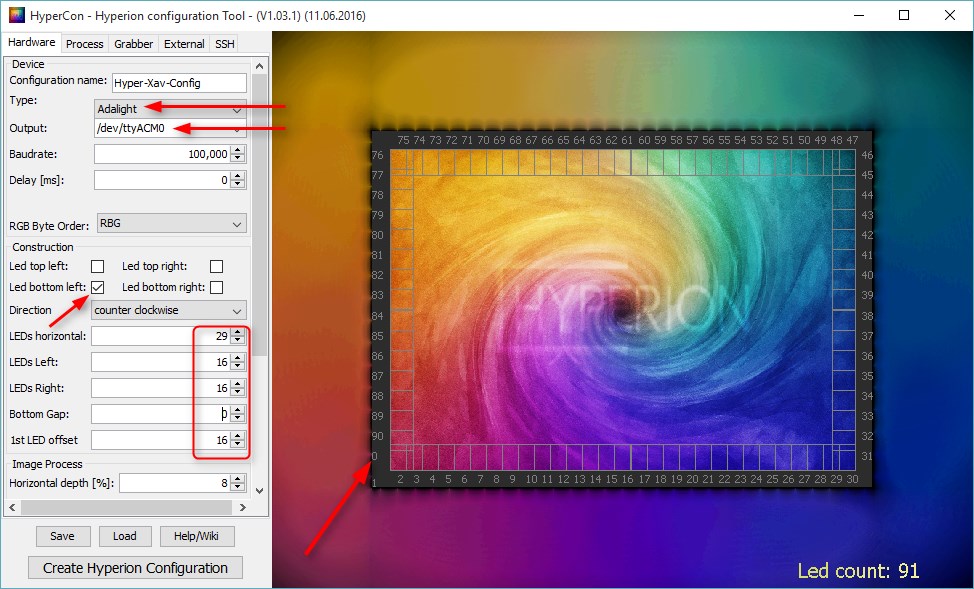
Hardware tab
- Type : Adalight
- Output : /dev/ttyACM0
- Construction : Select where your LED strip starts, facing the TV screen.
- Direction : Direction from start to end of the led strip.
- LEDs : Number of LEDs on each side.
- Bottom Gap: Number of LED top - Number of LEDs bottom.
- 1st LED offset: Adjust this value so the 0 is at the start of your strip on the image.
- Blackborder detection : Enabled (makes the LEDs work even with black borders).
- Threshold[%]: 1. Threshold under which the color is considered black.

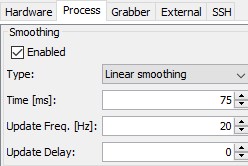
Process tab
- I change the “Time [ms]” value from 200ms to 75ms, otherwise it looks like there is a latency and the LEDs or not in sync with the TV especially in scenes with a lot of action.
Skip the grabber tab as you shouldn’t need to touch anything there.
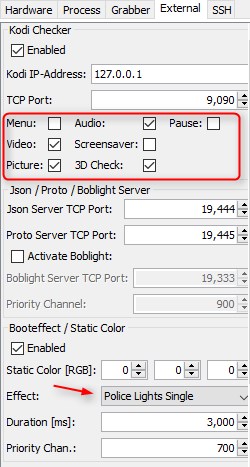
External tab
Kodi checker allows hyperion to get the status of Kodi.
This is why we enabled the two checkboxes earlier.
-
Leave 9090 if you haven’t changed the default port.
-
Uncheck the boxes for when you want the LEDs to be switched off.
-
Under “Effect” you can change the effect on the LEDs at the startup of Kodi. The police one is pretty fun but rainbow is cool too.
Save config
-
Click “Save” to save the parameters in a dat file.
-
Click “Create Hyperion Configuration” to create the actual config file called “hyperion.config.json”.
installation of Hyperion and push of the config
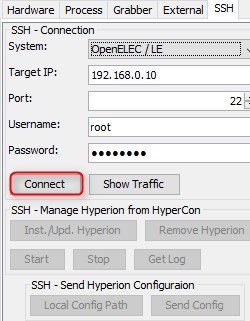
SSH tab
- Select your System (OpenElec/LibreElec or not OpenElec/LibreElec). So if you have OSMC choose “All systems”.
- Enter IP, username, password and click connect.
- Click “Inst./Update Hyperion” and wait for it to finish (can take a little while).
- Once it’s finished restart OpenElec.
- Reconnect with Hypercon.
- Click “Stop” to stop the Hypercon daemon.
- Click “local path” and select your generated “hyperion.config.json”.
- Click “Send” to send the config to hyperion.
- Start the daemon.
If it worked you should see the boot sequence that you chose in the external tab (“Police lights single”).
Now check the colors with the color picker (choose it and click “Set led color”). The main ones you want to check are red, green and blue.
If they are inverted you need to recreate the config file after changing the order in the hardware tab under “RGB Byte Order”.
For example, if your leds are blue when you choose red and vice-versa, change RGB to BGR.
Color calibration
By far the most annoying part of the setup, the color calibration. It isn’t easy to tell when the color is true or when it is blueish or greenish, but doing it might give better results.
When I did the calibration I realised that my green was off and I had to add 50 “red” in the green to get it right.
You can follow the tutorial made by the Hyperion guys.
https://hyperion-project.org/wiki/Color-Calibration
Mobile app
Something pretty cool as well is to control your LEDs with your smartphone. You can set a fixed color or play the preconfigured effects, I use it a lot as a ambient light in my living room.
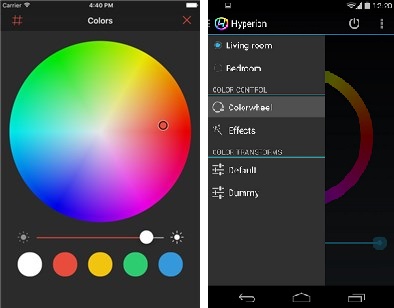
Link to the apps:
iPhone
Android
Version without lightberry
If you want to use the GPIO pins instead of the lightberry converter, it will be globally the same process with a few exceptions.
Led strip connection to the GPIO:
- Clock to pin 23 (Usually CK)
- Data to pin 19 (Usually DI or SI)
- GND to pin 6
Power supply to the LED strip:
- You still need a power supply (like my 5V, 4A)
- You need a DC adapter to connect the strip : Like this one
- Connect the 5V of the LED to the + of the connector
- Connect the GND of the LED to the - of the connector
Hyperion config:
- Instead of choosing Adalight > Choose WS2801
- Instead of choosing /dev/ttyACM0 > choose /dev/spidev0.0
Then you will need to get all of this nice and tidy with connectors, heat shrink and wires. The rest is essentially the same.