In the event of a PSOD (Purple Screen Of Death) ESXi will try to save a core dump of the vmkernel and a screenshot of the console screen, which can be crucial for diagnosing the root cause of the failure.
There are two types of locations that can be configured as a target for the core dump files:
-Disk dump collection: The host stores the files on a partition on disk dedicated to that.
-Network dump collection: The host sends the data to the Network Dump Collector service over the network, which will most likely be the vCenter.
I will only talk about the network way in this article as this is the one that I’m interested in. Although I advise you to configure a local diagnostic partition as well in case of a problem preventing the host to send over the network (NetDump service bricked, network problem, …). How to configure a local dump partition.
vCenter configuration
First of all the vCenter must be configured to accept the files through the Network Dump Collector Service. The Dump Collector service for Windows is packaged in the vCenter 6.0 and doesn’t have to be installed on the vCenter one but in most cases it will be. I installed mine on my vCenter as I couldn’t think of any purpose splitting them would serve, adding an extra layer of complexity.
It is very likely that the Dump Collector was already installed with vCenter but if, for some reason, it wasn’t or if you want it to be on a separate box, you will find the installer in the vCenter media in CD:\vCenter-Server\Packages\VMware-Netdump.msi
Netdump-setup.xml
The configuration is done in an xml file located at the following path (edit according to your VMware installation folder):
C:\ProgramData\VMware\vCenterServer\data\netdump\netdump-setup.xml
The interesting tags to configure will allow you to tune a few settings of the network core dump service.
Path to the directory where the logs of the service are stored, I use a log folder on a data disk.
defaultLogPath
Path to the directory where the actual core dump files are stored, I use a data folder on a data disk.
defaultDataPath
Amount of disk space in GB that can be used for it, I set 4 (which is too much) because I have plenty of space.
maxSize
You can configure the UDP port to use (default 6500) that you will need to adjust according to your network/server configuration. This setting, along with MaxSize can be configured in the webclient as well in Services>ESXi Dump Collector.
Save the file and close it.
NetDump service
Now we need to set the Network dump collector service to start automatically on vCenter. In the web client go to Administration > System Configuration > Services > VMware vSphere ESXi Dump Collector.
Note that you must be logged as sso admin ([email protected]) to get the services view.
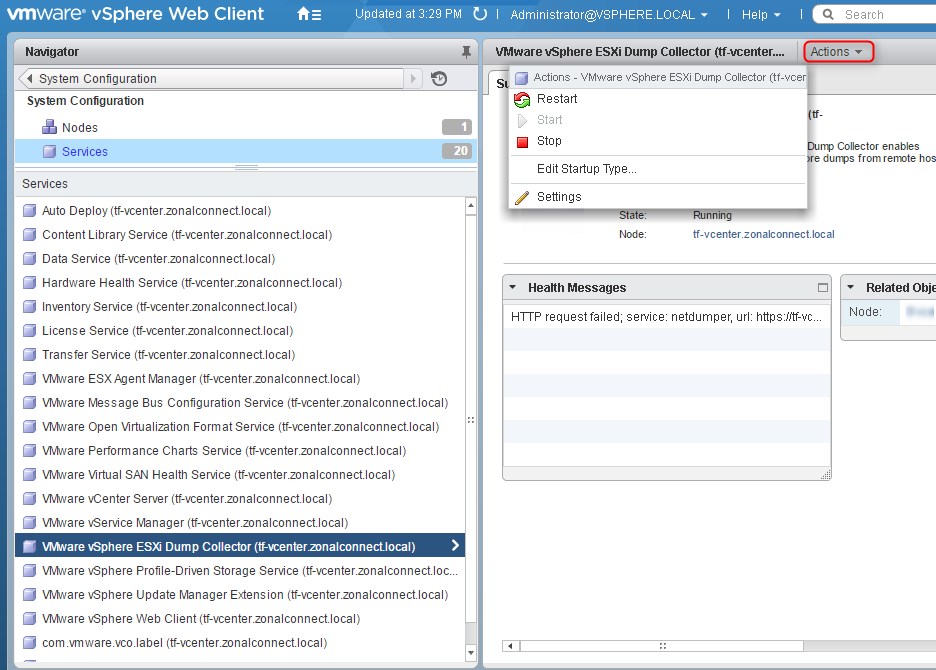
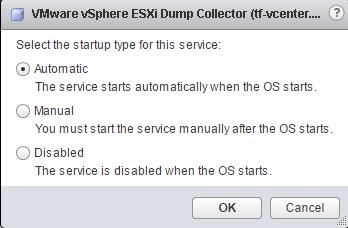
Then click action > Edit startup type and set it to automatic.
Start or restart the service from the action tab.
You can still check on windows if the service vmware-network-coredump is running but it should be.

ESXi Host configuration
Configuring the hosts using powerCLI is only a few commands away. It is usually configured with esxcli directly on the host’s console or via SSH but the good thing in doing it in powershell is that you can include it in a configuration script for example.
Let’s use the new Get-EsxCli V2 that came with the version 6.3 R1 of PowerCLI.
Configuration
$esxcli2 = get-esxcli -v2 -vmhost (get-vmhost ESX1)
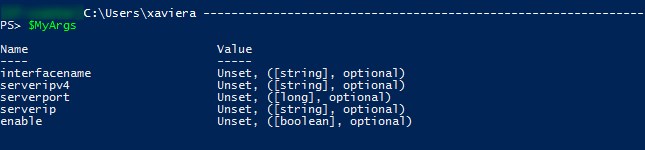
$MyArgs = $esxcli2.system.coredump.network.set.CreateArgs()
If we look into the arguments variable we will find the properties that we can use.
Note that “enable” can only be used if it is the only property of the variable. You can’t configure the anything and enable at the same time.
We need to add the properties in the argument variable. Put whatever your settings are.
I use vmk0 which is traditionnaly the management nic (mine anyway).
Of course if you’ve changed the default port (6500) before you will need to add the property here as well.
Then we set these settings with the Invoke method.
$MyArgs.interfacename = "vmk0"

$MyArgs.serveripv4 = "@IPVCENTER"

$esxcli2.system.coredump.network.set.Invoke($MyArgs)
We now need to enable it.
$MyArgs = $esxcli2.system.coredump.network.set.CreateArgs()

$MyArgs.enable = "true"

$esxcli2.system.coredump.network.set.Invoke($MyArgs)
Verification
To verify that the host has been configured just run a “get” then a “check”.
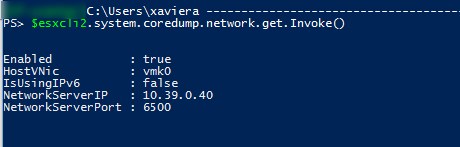
$esxcli2.system.coredump.network.get.Invoke()
The output should contain the values that you configured your MyArgs variable with.
To verify the communication with the Network coredump service on vCenter.
$esxcli2.system.coredump.network.check.Invoke()
The output should say “Verified the configured netdump server is running”.
Better save the configuration with a
/sbin/auto-backup.sh
And that’s it, now you just have to wait for your host to burn!