In the majority of VMware environments, the use of limits (especially memory limits) is strongly discouraged as it can lead to several misbehaviours such as CPU ready or memory swapping, which no one wants.
But in some cases it can be useful to leverage them, provided it is implemented with sensibility. For example, if you host customer VMs running the same piece of software, it is likely that you want to serve them equally as they probably pay the same amount of money.
Managing limits can sometimes be a hassle as there is no view in the client for the limits or reservations, you need to check them and set on a per-vm basis.
In order to simplify the process of assigning CPU limits to the virtual machines I came up with a PowerCLI script that I call every night through a scheduled task on a “task box” under a “VMware admin” service account I use for my PowerCLI tasks.
The interesting feature with this script is that if the tag’s name respects the naming convention, the VM CPU limit will be set accordingly dynamically, for example:
| Tag name | CPU limit set |
|---|---|
| QOS_1000 | 1000 MHz |
| QOS_2549 | 2549 MHz |
| QOS_5000 | 5000 MHz |
| QOS_NOLIMIT | Unlimited (-1) |
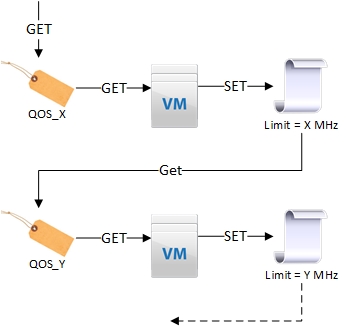
The script retrieves all the VMs per QOS tag one by one and updates their resource configurations if they are not already set according to the number in the tag’s name.
To assign a limit to a VM, you just need to assign the right tag to it and the next run of the scheduled task will set it. Personnaly I’ve set it to run every day at 9pm, but it is up to you to set it to more or less often.
Before getting into the script let’s go through the few steps to get it ready.
Create the tags and a tag category
First create a tag category configured for one tag per object and associable with virtual machines only. give it a name that makes sense to you along with a quick description for the colleagues.
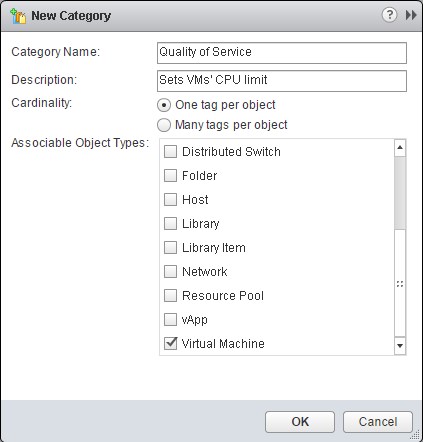
PowerCLI command : Powershell
New-TagCategory -Name "Quality of Service" -Cardinality "Single" -EntityType "VirtualMachine" -Description "Sets VMs CPU limit"
Then create a set of tags formatted like in the tag name column of the table above, don’t forget to create the tag QOS_NOLIMIT.
You can create as many as you want but there is not point having to many, I recommend something like:
-1500, 2500 for small VMs.
-4000, 6000 for bigger VMs.
-NOLIMIT for the VIP VMs.
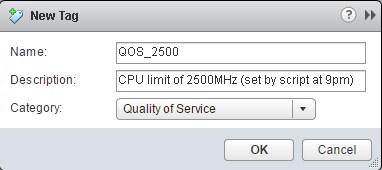
PowerCLI command : Powershell
Get-TagCategory -Name "Quality of Service" | New-Tag -Name "QOS_2500" -Description "CPU limit of 2500MHz (set by script at 9pm)"
! Warning ! Do not set limits equal to 0MHz! vSphere won’t prevent you from doing it but it will freeze the VM, its options will be greyed out and you will just have to wait until it powers off which can take a long time (only way to come back from the deads).
Now that the tags are created in the right category, assign it to a VM either using the GUI or PowerCLI, you can only assign one tag of this category for obvious reasons.
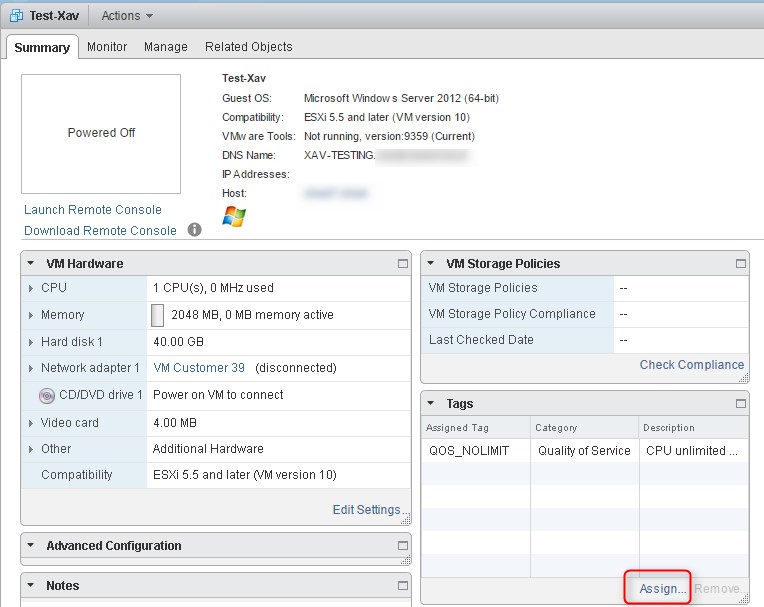
PowerCLI command : Powershell
Get-VM "Test-Xav*" | New-TagAssignment -Tag (Get-Tag "QOS_2500")
You can now virtually query the VMs with a said limit by searching the QOS tags in the vSphere web client!
Assign-TagQOS.PS1
You can find the .ps1 script file on my github: Assign-TagQOS.ps1
Either interactively or in a scheduled task, the account under which you run the script must have the right permissions on the vCenter to perform admin tasks.
You now just need to store it somewhere where you can call it from within a scheduled task either using a batch file or as a parameter of powershell.exe.
Again, it is not implemented in the scripts that I share on Github but it is advised to do some logging and monitoring.
Assign-TagQOS -vCenterServer MY-VCENTER.LOCAL
function Assign-TagQOS {

param(
    [Parameter(Mandatory = $True)]
    [ValidateNotNullOrEmpty()]
    [string]$vCenterServer
)

    $ErrorActionPreference = 'stop'
    Add-PSSnapin VMware.VimAutomation.Core
    $Session = Connect-VIServer -Server $vCenterServer 3>&1 | Out-Null

    Get-Tag -Name "QOS_*" | ForEach-Object {

        try {

            $tag = $_

            IF ($tag.name -eq "QOS_NOLIMIT") {
                $Limit = $null                      ; $Check = -1
            } ELSE {
                $Limit = (($tag.name).Trim("QOS_")) ; $Check = $Limit
            }

            Get-VM -Tag $tag | Get-VMResourceConfiguration | Where-Object {$_.CpuLimitMhz -ne $Check} |

                Set-VMResourceConfiguration -CpuLimitMhz $Limit | Select-Object VM,@{l='Tag';e={$tag.name}},CpuLimitMhz
        }

        catch {Write-Error $_.Exception -ErrorAction Continue}

        Clear-Variable Limit,tag

    }
}
Bonus script: Get-VMCPULimit.ps1
Function Get-VMCpuLimit {

Param(
     [parameter(position=0,ValueFromPipeline=$True,ValueFromPipelineByPropertyname=$True,Mandatory=$True)]
     [VMware.VimAutomation.ViCore.types.V1.Inventory.VirtualMachine[]]
     $VM
)

$VM | ForEach-Object {

    [pscustomobject]@{
        VM    = $_.name
        Limit = $_.ExtensionData.Config.CpuAllocation.Limit
    }
}
}